It’s time for the yearly “Tech Infra at home” update. Feel free to take a look at the last posts from 2022 and 2020 on that topic.
This one is reasonably short, let’s start with having a look at the device diagram:
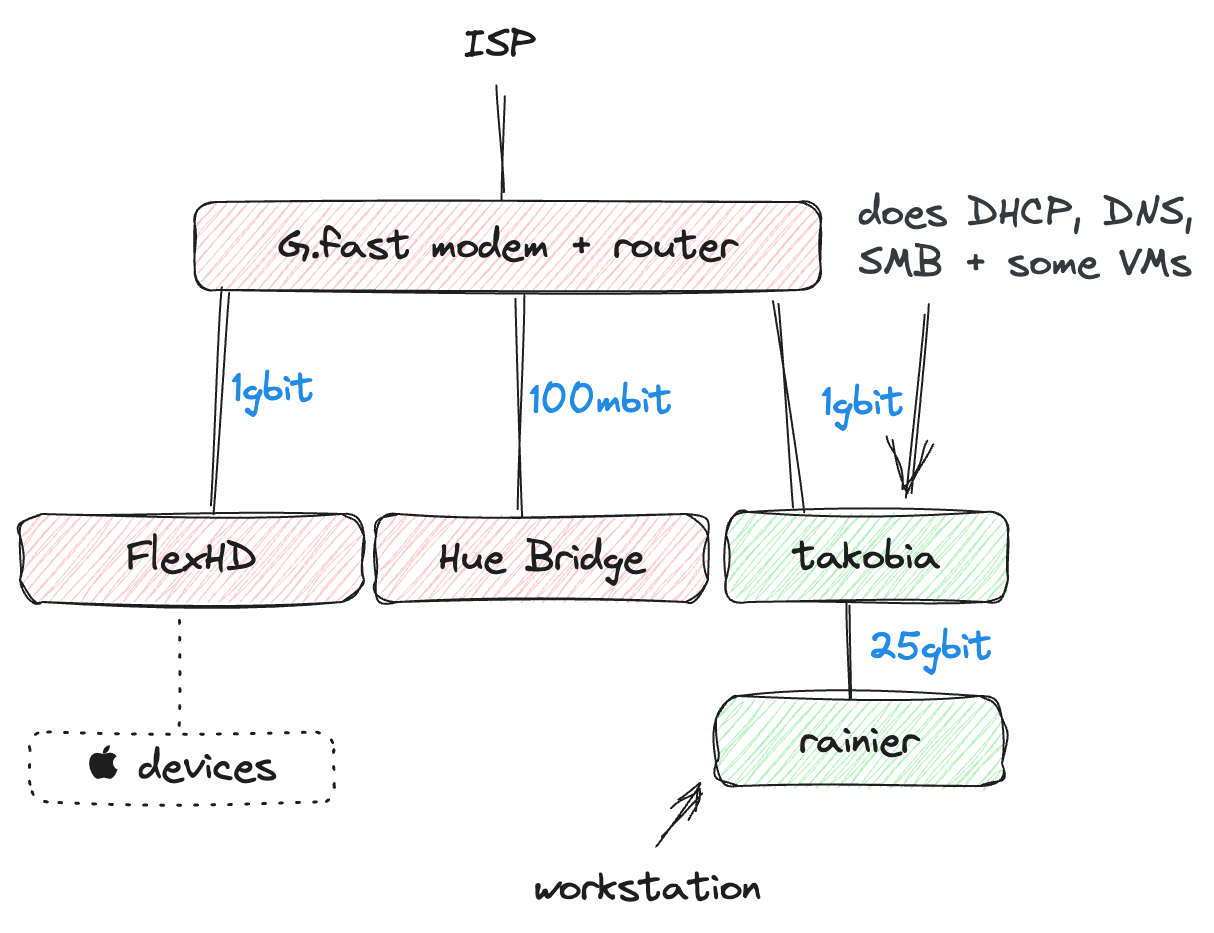
There are a number of important changes present: First and foremost, I got rid of the EdgeRouter-X. Ubiquiti stopped updating it and it couldn’t handle 700 Mbps routing anyway. Now I’m back to using the ISP-provided modem box. It works reasonably well, at least it can handle my upstream/downstream speeds. My building uses G.fast to provide Gigabit access through old phones lines up until the signal reaches the ONT in the cellar. I was quite sceptical of the technology initially, but so far I’m really quite happy with the connectivity and reliability of the uplink.
The Pi and separate NAS box are gone and have been replaced by a custom-built 8L PC (nicknamed Takobia). The Pi ended up being too slow for some tasks (as it was the only “capable” device that was always on). Phasing it out would only make sense.
The NAS box was fine, but always waiting for it to turn on for a backup (and automatically shutting it down afterwards) proved to be a hassle. I also noticed that my storage footprint is pretty small and I don’t really care too much about data redundancy. Having an off-site backup for important stuff is unavoidable anyway. Also, idle power consumption was a nightmare due to all the HDD (~50-60W even after powertop tuning, which translates to ~12.50€ a month when powered on 24/7). Shutting down HDDs between backups just wears them down (they hate heat cycles), so that was no good alternative.
Building a new low-power home server
The key requirements before building Takobia were
- Small device footprint. It should fit into one IKEA Kallax square (33x33x39). I don’t care too much about the noise at it sits in the home office room anyway.
- Always on. And since energy is costly these days, it should be low power (at least during idle).
- At least 4TB of really fast storage, capable of fully-utilizing at 25GbE connection during sequential reads. However, there is no need for high redundancy as this is for nice-to-have backups, but nothing essential.
- Reasonably cheap. I don’t really have a need for enterprise-grade hardware (and I’m fine with running memtest86 once in a while). Finding a chipset with ECC support is pretty costly for Intel, the situation is better on AMDs side of things but nah.
- Connectivity. A couple of USB ports are always sweet in case I opt to connect additional add-on devices later on (e.g. scanner). I also need a single x16 PCIe slot for a 25GbE networking card.
The initial step was to settle on a specific platform. I’ve had a great experience with the Ryzen 5950X in my workstation, however, it’s not exactly energy saving. After looking at a number of idle energy consumption graphs online, I decided to take a shot again at Intel. The most recent generations of consumer Intel CPUs feature a Big-Little design (so we have low-power efficiency cores + high-power performance cores). With a little bit of tuning, we can heavily utilize the efficiency cores and avoid using the high-power cores altogether except for computationally heavy work.
The newest Raptor Lake CPUs i5 13400 and i5 13500 have both an excellent performance profile, feature a built-in GPU and a very low idle power footprint. The Passmark score of the i5 13400 sits at 25275, while the i5 13500 sits at 32468, so roughly 30% faster. I opted to go with the i5 13500 just in case I ever need the extra performance.
Next up was deciding on a case: Since my storage requirements strongly hinted towards a board with at least one M.2 w/ PCIe x4 connectivity, I ventured into the world of small-form factor PCs and discovered the ASRock DeskMeet B660. A perfect match: Cheap, motherboard + PSU were already included, 4 slots of DDR4 RAM (typically not available in that form factor) + even a PCIe 4.0 x16 extension slot. After I had the case and CPU, I just settled for readily available and cheap components to complete the build.
| Component | Price |
|---|---|
| ASRock DeskMeet B660 | 184,99€ |
| Intel Core i5 13500 | 261,25€ |
| Lexar NM790 4TB | 195€ |
| bequiet! MC1 | 10,90€ |
| Thermalright AXP90-X47 Full | 37,90€ |
| ARCTIC MX4 | 5,49€ |
| 2x Kingston KVR32N22D8/32 | 136€ |
| Total | 830.53€ |
After tuning idle energy consumption, I’ve arrived at about 26W idle power consumption. As my energy price is fixed for the next 12 months at 0.2887€, I expect about 65€ in terms of energy costs per year. Assuming I can turn down my existing rented VPS instances (saving me 17.58€ per month) and move that workload over to Takobia, this will yield about 150€ in savings per year. In the case that this machine keeps running as long as its predecessor did (over 10 years), the savings will actually exceed the cost of buying the PC components in the first place.
For 25GbE networking I use two Mellanox MCX4121A-ACAT sourced from Ebay for 69€ a piece interconnected via an off-the-shelf SFP28 DAC cable for just over 30€. The fast interconnect enables Takobia to serve as a very fast storage extension for my main workstation.
Software stack
Takobia uses sox (which was called VirtM up until recently), a pretty web UI I built around libvirtd. It allows me to quickly turn VMs up and down, just as I need them and I can easily extend it with all the features I require myself. I got the idea to built something like sox from DigitalOcean as they (at least in the past) have been providing most of their machine management on top of libvirtd as well.
I already mentioned sox in the infra update last year, however, I recognize now that the project may require some rescoping (so I actually get around to implement some of the features I want). I’ll most likely drop anything that is required for cluster use as my only use case for now is a single machine anyway. Anyway, I’ll need to polish the UI and add some must-have features like SSH from the web UI, better observability and machine resizing. As mentioned above, the VMs are mostly there to take over the workload from Hetzner (which is mostly running Valar).
Otherwise, Takobia will end up taking over CoreDNS + dnsmasq DHCP service from the Raspberry Pi. I also run a little tool called dnsmasq-lth which generates hosts files from dnsmasq leases. To provide network-accessable file & software repository storage, Takobia runs smbd (with additional customizations to enable macOS Time Machine backups) and a small gitea instance. Back in 2020, I also had the old NAS store a basic copy of accessible sites on the WWW (mostly Wikipedia + TED talks). This was due to the unreliable ISP, nowadays 4G reception in my apartment is good enough thus I’ll drop the offline mirror support.
What’s next?
As more of my devices have support for more recent Wifi standards, I’ll have a look into upgrading this area. I’d love to have my Macbook be able to access the file-storage mentioned above with more than 1 Gbps over WiFi. To make this possible, I’ll have to find an access point which supports cable-based connectivity at these speeds. There are a couple of 2.5GbE APs around at reasonable prices, e.g. the TP-Link Omada EAP670 AX5400, but anything beyond 2.5GbE is still quite exotic.