<feed xmlns="http://www.w3.org/2005/Atom"><title>Shard Mind</title><link href="https://blog.espe.tech/feed.xml" rel="self"/><link href="https://blog.espe.tech/"/><id>https://blog.espe.tech/</id><generator>Hugo -- gohugo.io</generator><entry><title type="html">How to shrink a volume — or TIL about backup GPT headers</title><link href="https://blog.espe.tech/posts/til-about-backup-gpt/"/><id>https://blog.espe.tech/posts/til-about-backup-gpt/</id><published>2025-06-10T21:00:00+01:00</published><content type="html"><![CDATA[<p>Today I learned about backup GUID partition tables. Let me explain how.</p>
<p>I recently moved my virtualization setup at home <a href="https://minisforumpc.eu/en/products/ms-a2-mini-pc?srsltid=AfmBOorl_At6-Q3SEf68NRZQnhQWrAmAGsadwLtIBBxzNIdf1LVpUmFZ">to the newly released Minisforum MS-A2</a>. The experience so far has been solid, besides it being slightly noisier than I expected.</p>
<p>As part of the move, I migrated all my VMs over to the new machine. When I ordered the MS-A2, I only got a single Lexar NM790 4TB drive initially as I still had the other 4TB SSD still built into the old home server. The idea was that I could tear it off the old server and plug it into the MS-A2 (as it has 3 NVMe slots, albeit with different speeds) after the migration.</p>
<p>But after moving all the VMs I faced a dilemma: I was lacking the space to hibernate them for machine maintenance. Shutting them down instead of hibernating them would cause me a great deal of pain - restarting the Valar VM instances is sadly non-trivial.</p>
<p>Thus, I needed to look for space somewhere else. One of the largest logical disks I have mounted to VMs was a 2.44TiB volume used for storing RAW files for my photography collection. Only 1.3TiB was unused, so I could easily reduce the disk size temporarily.</p>
<p>So I came up with a plan.</p>
<div class="highlight"><pre tabindex="0" style="color:#ebdbb2;background-color:#282828;-moz-tab-size:4;-o-tab-size:4;tab-size:4;-webkit-text-size-adjust:none;"><code class="language-bash" data-lang="bash"><span style="display:flex;"><span><span style="color:#928374;font-style:italic"># This happens inside the VM that is normally mounting that volume.</span>
</span></span><span style="display:flex;"><span><span style="color:#928374;font-style:italic"># First, make sure /dev/sdb1 is good and happy.</span>
</span></span><span style="display:flex;"><span>e2fsck -f /dev/sdb1 
</span></span><span style="display:flex;"><span><span style="color:#928374;font-style:italic"># Next, resize the partition to 1.7TiB.</span>
</span></span><span style="display:flex;"><span>resize2fs /dev/sdb1 1.7T
</span></span></code></pre></div><p>For the record, here is the resulting layout as reported by <code>fdisk</code>.</p>
<div class="highlight"><pre tabindex="0" style="color:#ebdbb2;background-color:#282828;-moz-tab-size:4;-o-tab-size:4;tab-size:4;-webkit-text-size-adjust:none;"><code class="language-bash" data-lang="bash"><span style="display:flex;"><span>Disk /dev/pve/vm-104-disk-1: 2.44 TiB, <span style="color:#d3869b">2684354560000</span> bytes, <span style="color:#d3869b">5242880000</span> sectors
</span></span><span style="display:flex;"><span>Units: sectors of <span style="color:#d3869b">1</span> * 512 <span style="color:#fe8019">=</span> <span style="color:#d3869b">512</span> bytes
</span></span><span style="display:flex;"><span>Sector size <span style="color:#fe8019">(</span>logical/physical<span style="color:#fe8019">)</span>: <span style="color:#d3869b">512</span> bytes / <span style="color:#d3869b">512</span> bytes
</span></span><span style="display:flex;"><span>I/O size <span style="color:#fe8019">(</span>minimum/optimal<span style="color:#fe8019">)</span>: <span style="color:#d3869b">65536</span> bytes / <span style="color:#d3869b">65536</span> bytes
</span></span><span style="display:flex;"><span>Disklabel type: gpt
</span></span><span style="display:flex;"><span>Disk identifier: 3637D381-0EFA-44FE-89E3-016A3BA2C60F
</span></span><span style="display:flex;"><span>
</span></span><span style="display:flex;"><span>Device                   Start        End    Sectors  Size Type
</span></span><span style="display:flex;"><span>/dev/pve/vm-104-disk-1p1    <span style="color:#d3869b">40</span> <span style="color:#d3869b">3565158439</span> <span style="color:#d3869b">3565158400</span>  1.7T Linux filesystem
</span></span></code></pre></div><p>Now, I could get to work with <code>lvreduce</code>. As I already knew we need some extra space around that single partition, I reduced the disk to 1.75TiB.</p>
<div class="highlight"><pre tabindex="0" style="color:#ebdbb2;background-color:#282828;-moz-tab-size:4;-o-tab-size:4;tab-size:4;-webkit-text-size-adjust:none;"><code class="language-bash" data-lang="bash"><span style="display:flex;"><span>$ lvchange -an /dev/pve/vm-104-disk-1
</span></span><span style="display:flex;"><span>$ lvreduce -L 1.75T /dev/pve/vm-104-disk-1
</span></span><span style="display:flex;"><span>  Size of logical volume pve/vm-104-disk-1 changed from 2.44 TiB <span style="color:#fe8019">(</span><span style="color:#d3869b">640000</span> extents<span style="color:#fe8019">)</span> to 1.75 TiB <span style="color:#fe8019">(</span><span style="color:#d3869b">458752</span> extents<span style="color:#fe8019">)</span>.
</span></span><span style="display:flex;"><span>  Logical volume pve/vm-104-disk-1 successfully resized.
</span></span><span style="display:flex;"><span>$ lvchange -ay /dev/pve/vm-104-disk-1
</span></span></code></pre></div><p>Should be good right? I started the VM using the disk and was shocked to see the following <code>lsblk</code> output.</p>
<div class="highlight"><pre tabindex="0" style="color:#ebdbb2;background-color:#282828;-moz-tab-size:4;-o-tab-size:4;tab-size:4;-webkit-text-size-adjust:none;"><code class="language-bash" data-lang="bash"><span style="display:flex;"><span>$ lsblk
</span></span><span style="display:flex;"><span>NAME   MAJ:MIN RM  SIZE RO TYPE MOUNTPOINTS
</span></span><span style="display:flex;"><span>sda      8:0    <span style="color:#d3869b">0</span>  600G  <span style="color:#d3869b">0</span> disk
</span></span><span style="display:flex;"><span>└─sda1   8:1    <span style="color:#d3869b">0</span>  600G  <span style="color:#d3869b">0</span> part /
</span></span><span style="display:flex;"><span>sdb      8:16   <span style="color:#d3869b">0</span>  2.4T  <span style="color:#d3869b">0</span> disk
</span></span><span style="display:flex;"><span>sr0     11:0    <span style="color:#d3869b">1</span> 1024M  <span style="color:#d3869b">0</span> rom
</span></span></code></pre></div><p>You might not notice it immediately, but my <code>/dev/sdb1</code> partition was suddenly missing. My first thought was to investigate using <code>fdisk -l /dev/sdb</code>, only being left more confused afterwards.</p>
<div class="highlight"><pre tabindex="0" style="color:#ebdbb2;background-color:#282828;-moz-tab-size:4;-o-tab-size:4;tab-size:4;-webkit-text-size-adjust:none;"><code class="language-bash" data-lang="bash"><span style="display:flex;"><span>$ fdisk -l /dev/sdb
</span></span><span style="display:flex;"><span>Disk /dev/sdb: 1.75 TiB, <span style="color:#d3869b">1924145348608</span> bytes, <span style="color:#d3869b">3758096384</span> sectors
</span></span><span style="display:flex;"><span>Disk model: QEMU HARDDISK
</span></span><span style="display:flex;"><span>Units: sectors of <span style="color:#d3869b">1</span> * 512 <span style="color:#fe8019">=</span> <span style="color:#d3869b">512</span> bytes
</span></span><span style="display:flex;"><span>Sector size <span style="color:#fe8019">(</span>logical/physical<span style="color:#fe8019">)</span>: <span style="color:#d3869b">512</span> bytes / <span style="color:#d3869b">512</span> bytes
</span></span><span style="display:flex;"><span>I/O size <span style="color:#fe8019">(</span>minimum/optimal<span style="color:#fe8019">)</span>: <span style="color:#d3869b">512</span> bytes / <span style="color:#d3869b">512</span> bytes
</span></span><span style="display:flex;"><span>Disklabel type: dos
</span></span><span style="display:flex;"><span>Disk identifier: 0x00000000
</span></span><span style="display:flex;"><span>
</span></span><span style="display:flex;"><span>Device     Boot Start        End    Sectors Size Id Type
</span></span><span style="display:flex;"><span>/dev/sdb1           <span style="color:#d3869b">1</span> <span style="color:#d3869b">4294967295</span> <span style="color:#d3869b">4294967295</span>   2T ee GPT
</span></span></code></pre></div><p><strong>Where did my GUID partition table go? And why is there this <em>weird</em> GPT partition entry at sector 1?</strong></p>
<p>This is when I learned about GUID partition tables primary and backup locations: A standard GPT layout includes a primary GPT header and partition array at the beginning of the disk and a secondary (backup) GPT header and partition array at the very end of the disk.</p>
<p>So when I shrunk the disk, I correctly protected the data inside the EXT4 partition &ndash; but my backup GPT header still went to the dogs. And <code>fdisk</code> gets very confused when that backup GPT header is missing as it tries to look for that backup header and finds garbage data, falling back to the protective MBR.</p>
<p>Using <code>gdisk</code> revealed the problem in a more descriptive fashion.</p>
<div class="highlight"><pre tabindex="0" style="color:#ebdbb2;background-color:#282828;-moz-tab-size:4;-o-tab-size:4;tab-size:4;-webkit-text-size-adjust:none;"><code class="language-bash" data-lang="bash"><span style="display:flex;"><span>$ gdisk /dev/pve/vm-104-disk-1
</span></span><span style="display:flex;"><span>GPT fdisk <span style="color:#fe8019">(</span>gdisk<span style="color:#fe8019">)</span> version 1.0.9
</span></span><span style="display:flex;"><span>
</span></span><span style="display:flex;"><span>Warning! Disk size is smaller than the main header indicates! Loading
</span></span><span style="display:flex;"><span>secondary header from the last sector of the disk! You should use <span style="color:#b8bb26">&#39;v&#39;</span> to
</span></span><span style="display:flex;"><span>verify disk integrity, and perhaps options on the experts<span style="color:#b8bb26">&#39; menu to repair
</span></span></span><span style="display:flex;"><span><span style="color:#b8bb26">the disk.
</span></span></span><span style="display:flex;"><span><span style="color:#b8bb26">Caution: invalid backup GPT header, but valid main header; regenerating
</span></span></span><span style="display:flex;"><span><span style="color:#b8bb26">backup header from main header.
</span></span></span><span style="display:flex;"><span><span style="color:#b8bb26">
</span></span></span><span style="display:flex;"><span><span style="color:#b8bb26">Warning! One or more CRCs don&#39;</span>t match. You should repair the disk!
</span></span><span style="display:flex;"><span>Main header: OK
</span></span><span style="display:flex;"><span>Backup header: ERROR
</span></span><span style="display:flex;"><span>Main partition table: OK
</span></span><span style="display:flex;"><span>Backup partition table: ERROR
</span></span><span style="display:flex;"><span>
</span></span><span style="display:flex;"><span>Partition table scan:
</span></span><span style="display:flex;"><span>  MBR: protective
</span></span><span style="display:flex;"><span>  BSD: not present
</span></span><span style="display:flex;"><span>  APM: not present
</span></span><span style="display:flex;"><span>  GPT: damaged
</span></span><span style="display:flex;"><span>
</span></span><span style="display:flex;"><span>****************************************************************************
</span></span><span style="display:flex;"><span>Caution: Found protective or hybrid MBR and corrupt GPT. Using GPT, but disk
</span></span><span style="display:flex;"><span>verification and recovery are STRONGLY recommended.
</span></span><span style="display:flex;"><span>****************************************************************************
</span></span></code></pre></div><p>So how to fix it? Just write the GUID partition table using <code>gdisk</code> again. That&rsquo;s it.</p>
<div class="highlight"><pre tabindex="0" style="color:#ebdbb2;background-color:#282828;-moz-tab-size:4;-o-tab-size:4;tab-size:4;-webkit-text-size-adjust:none;"><code class="language-bash" data-lang="bash"><span style="display:flex;"><span>Command <span style="color:#fe8019">(</span>? <span style="color:#fe8019">for</span> <span style="color:#fabd2f">help</span><span style="color:#fe8019">)</span>: w
</span></span><span style="display:flex;"><span>
</span></span><span style="display:flex;"><span>Final checks complete. About to write GPT data. THIS WILL OVERWRITE EXISTING
</span></span><span style="display:flex;"><span>PARTITIONS!!
</span></span><span style="display:flex;"><span>
</span></span><span style="display:flex;"><span>Do you want to proceed? <span style="color:#fe8019">(</span>Y/N<span style="color:#fe8019">)</span>: Y
</span></span><span style="display:flex;"><span>OK; writing new GUID partition table <span style="color:#fe8019">(</span>GPT<span style="color:#fe8019">)</span> to /dev/pve/vm-104-disk-1.
</span></span><span style="display:flex;"><span>Warning: The kernel is still using the old partition table.
</span></span><span style="display:flex;"><span>The new table will be used at the next reboot or after you
</span></span><span style="display:flex;"><span>run partprobe<span style="color:#fe8019">(</span>8<span style="color:#fe8019">)</span> or kpartx<span style="color:#fe8019">(</span>8<span style="color:#fe8019">)</span>
</span></span><span style="display:flex;"><span>The operation has completed successfully.
</span></span></code></pre></div><p>Now, even <code>fdisk</code> got the note.</p>
<div class="highlight"><pre tabindex="0" style="color:#ebdbb2;background-color:#282828;-moz-tab-size:4;-o-tab-size:4;tab-size:4;-webkit-text-size-adjust:none;"><code class="language-bash" data-lang="bash"><span style="display:flex;"><span>$ fdisk -l /dev/pve/vm-104-disk-1
</span></span><span style="display:flex;"><span>Disk /dev/pve/vm-104-disk-1: 1.75 TiB, <span style="color:#d3869b">1924145348608</span> bytes, <span style="color:#d3869b">3758096384</span> sectors
</span></span><span style="display:flex;"><span>Units: sectors of <span style="color:#d3869b">1</span> * 512 <span style="color:#fe8019">=</span> <span style="color:#d3869b">512</span> bytes
</span></span><span style="display:flex;"><span>Sector size <span style="color:#fe8019">(</span>logical/physical<span style="color:#fe8019">)</span>: <span style="color:#d3869b">512</span> bytes / <span style="color:#d3869b">512</span> bytes
</span></span><span style="display:flex;"><span>I/O size <span style="color:#fe8019">(</span>minimum/optimal<span style="color:#fe8019">)</span>: <span style="color:#d3869b">65536</span> bytes / <span style="color:#d3869b">65536</span> bytes
</span></span><span style="display:flex;"><span>Disklabel type: gpt
</span></span><span style="display:flex;"><span>Disk identifier: 3637D381-0EFA-44FE-89E3-016A3BA2C60F
</span></span><span style="display:flex;"><span>
</span></span><span style="display:flex;"><span>Device                   Start        End    Sectors  Size Type
</span></span><span style="display:flex;"><span>/dev/pve/vm-104-disk-1p1    <span style="color:#d3869b">40</span> <span style="color:#d3869b">3565158439</span> <span style="color:#d3869b">3565158400</span>  1.7T Linux filesystem
</span></span></code></pre></div><p>Afterwards, I was able to set the <code>discard</code> flag on the mounted disk in my VM and use <code>fstrim</code> on the <code>/dev/sdb1</code> partition to reclaim the unused space in my volume group.</p>
]]></content></entry><entry><title type="html">Posts</title><link href="https://blog.espe.tech/posts/"/><id>https://blog.espe.tech/posts/</id><published>2025-06-10T21:00:00+01:00</published><content type="html"></content></entry><entry><title type="html">Reflecting on 1.5 years as a full-time SWE</title><link href="https://blog.espe.tech/posts/first-year-fte/"/><id>https://blog.espe.tech/posts/first-year-fte/</id><published>2024-03-11T00:00:00+00:00</published><content type="html"><![CDATA[<p>I joined Google in October 2022, so I&rsquo;ve been here about a year and a half now. Looking back, what were my expectations coming into the job?</p>
<h2 id="the-initial-offer-and-team-matching">The Initial Offer and Team Matching</h2>
<p>Let me rewind a bit. I signed the offer surprisingly early, back in March 2022. This was even <em>before</em> team matching, so I had no idea which team I&rsquo;d end up on.</p>
<p>Fortunately, the team matching process worked out well in the end. The first potential match was with an Android team. My recruiter reached out to ask if I was interested, and I was quick to say no. I&rsquo;m not really into Android development, and mobile development isn&rsquo;t my primary interest. While I enjoy dabbling with mobile projects sometimes, I didn&rsquo;t want it to be my full-time focus.</p>
<p>A couple of weeks later, she contacted me again about a team working on vulnerability management. At that point, I didn&rsquo;t have a concrete picture of what that would entail. Ultimately, I said yes – why not? It sounded more like backend software engineering and distributed systems work, which was far more appealing to me than mobile development.</p>
<p>I then met the hiring manager (who became my manager for the first few months). That meeting went great. A few days later, I also had a chat with the technical lead. They were both incredibly fast talkers, but the work sounded fun, so I decided to go for it.</p>
<p>I accepted the offer, and just like that, I had my team. That was pretty much the prelude. I officially started working in October and joined the team in Munich. Though, initially, Google flew me out to Sunnyvale for the first few weeks, which was a fantastic start.</p>
<h3 id="the-big-tech-feeling-in-the-bay-area">The &ldquo;Big Tech&rdquo; Feeling in the Bay Area</h3>
<p>I&rsquo;d never been to the US before, so visiting and experiencing the Bay Area tech scene was fascinating. The presence of the tech world there is vastly different compared to Munich. Here, even a large office like Google feels&hellip; well, just like another company office. It&rsquo;s nice, you get free food, all the perks you&rsquo;d expect – but it doesn&rsquo;t feel particularly special or like you&rsquo;re part of something massive.</p>
<p>You definitely get that sense in the US, especially in the Bay Area. When you catch a company shuttle, you can choose between dozens of different buildings. That felt wild. Meeting the US-based colleagues I now work with in person was incredibly valuable.</p>
<p>I&rsquo;m not against remote work at all, but I think meeting regularly, even just occasionally, to talk face-to-face and understand what others are working on is hugely important. Communication feels different in person. Chat is fine, but resolving complex problems often takes more effort via text.</p>
<h3 id="diving-in-rapid-onboarding-strategy">Diving In: Rapid Onboarding Strategy</h3>
<p>My approach during those first weeks was to dive in headfirst as much as possible. I believe getting a head start is always crucial. It builds goodwill with your manager and colleagues, allowing you to tackle problems quickly and absorb information rapidly. You can always find a more sustainable pace later.</p>
<p>This is a strategy I&rsquo;ll definitely repeat whenever I switch teams, projects, or companies down the line. Just intensely focusing for a few weeks at the start. After that initial sprint, you can figure out the right balance: how much work do you <em>want</em> to do, how much are you <em>doing</em>, and how much is <em>expected</em>? Finding that equilibrium takes time. Even with my intensive approach, onboarding still took a while, maybe about a month.</p>
<p>I immersed myself in coding for the first month or two, and productivity really started to ramp up after that. Getting familiar with the code, getting to know people, and navigating code reviews became the focus.</p>
<h3 id="the-critical-role-of-people-skills">The Critical Role of People Skills</h3>
<p>One thing I perhaps underestimated, even after internships, is just how crucial it is to get to know the people who will be reviewing your code. It&rsquo;s absolutely vital for the code review process itself.</p>
<p>Why? Because everyone has a different style and different priorities when writing code. Some emphasize strict &ldquo;Don&rsquo;t Repeat Yourself&rdquo; (DRY) principles, others prioritize simplicity, and there are many other preferences. You honestly can&rsquo;t satisfy <em>all</em> of them simultaneously.</p>
<p>Sometimes, with a specific piece of code, you have to make a choice – you can lean into one principle or another, but you can&rsquo;t perfectly achieve everything without spending excessive time on it.</p>
<p>Knowing who your reviewers are allows you to anticipate their preferences and subtly adapt your coding style accordingly. I guess it&rsquo;s similar to &ldquo;code-switching&rdquo; in language, where you vary how you speak depending on who you&rsquo;re talking to.</p>
<p>Applying this to code reviews means you vary the &ldquo;dialect&rdquo; of your code based on your audience. This helps get your changes submitted much quicker, which is essential for team velocity. You spend less time debating <em>why</em> you made a certain choice because you&rsquo;ve already aligned closer to their expectations.</p>
<p>So, yes, that&rsquo;s a key takeaway: understanding your reviewers is incredibly important.</p>
<p>Beyond code reviews, I was assigned my first project collaborating with a senior engineer who was also relatively new to the team. We were both learning a lot. Another team member had been there longer and helped guide us. It was a fantastic experience. The senior engineer gave me plenty of space to lead the coding work, mostly handling external communication and coordination, while I focused on writing the code and ensuring everything ran smoothly.</p>
<p>For the second project, he was still assigned with me but was much more hands-off. I essentially had full ownership – writing the design docs and executing the implementation. It was incredibly fun figuring out the problems and finding solutions.</p>
<p>Throughout all this, I regularly checked in with my manager about my progress. At one point, they simply suggested, &ldquo;You&rsquo;re writing design docs, you seem ready for the next level. You should apply for promotion.&rdquo;</p>
<p>I did, and it went through! I got promoted within my first year and have been at the next level for about six months now. Honestly, it doesn&rsquo;t feel drastically different. The main change is that I&rsquo;m no longer in the onboarding phase; I know the systems and, more importantly, the people.</p>
<p>Regarding people, it&rsquo;s probably the topic whose impact on the work I most underestimated. How much difference do diverse personalities and approaches make within a team? A lot. Different people handle problems differently, and communicating effectively with each person often requires a distinct approach.</p>
<p>Some colleagues prefer you to cut straight to the chase: &ldquo;Here&rsquo;s the problem, here&rsquo;s the solution.&rdquo; Others really want to understand the problem deeply first and explore potential paths together before hearing a proposed solution.</p>
<p>Honestly, it can sometimes be challenging to fully grasp how certain people think or &ldquo;tick.&rdquo; But I&rsquo;m working on getting better at it. Reading people is an extremely valuable skill. I didn&rsquo;t arrive with the expectation that it would be so central to the job, but it truly is.</p>
]]></content></entry><entry><title type="html">Tech infra at home / 2023 edition</title><link href="https://blog.espe.tech/posts/tech-at-home-2023/"/><id>https://blog.espe.tech/posts/tech-at-home-2023/</id><published>2023-09-30T16:12:00+02:00</published><content type="html"><![CDATA[<p>It&rsquo;s time for the yearly &ldquo;Tech Infra at home&rdquo; update. Feel free to take a look at the last posts from <a href="https://blog.espe.tech/posts/tech-at-home-2022/">2022</a> and <a href="https://blog.espe.tech/posts/tech-at-home-2020/">2020</a> on that topic.</p>
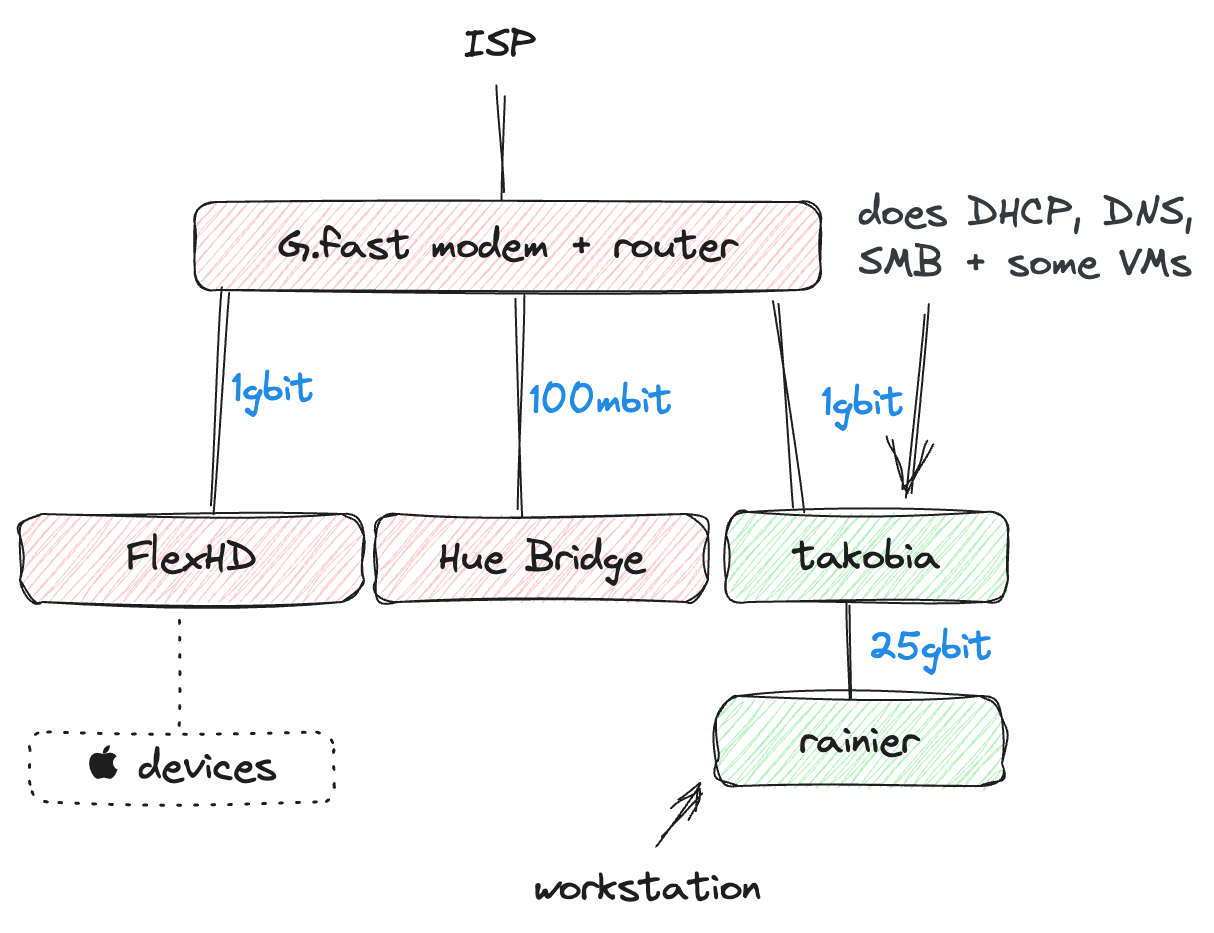
<p>This one is reasonably short, let&rsquo;s start with having a look at the device diagram:</p>


<a href="https://blog.espe.tech/posts/tech-at-home-2023/overview.png"><img
  srcset="https://blog.espe.tech/posts/tech-at-home-2023/overview_hu_7666790b7e3937a2.png 2x,https://blog.espe.tech/posts/tech-at-home-2023/overview_hu_4e3da7f5d5542555.png 3x"
  src="https://blog.espe.tech/posts/tech-at-home-2023/overview_hu_1634c356f3cd1fd7.png"
  
  style="border: 1px solid #000; width: 100%"
  
  loading="lazy"></a>


<p>There are a number of important changes present:
First and foremost, I got rid of the EdgeRouter-X. Ubiquiti stopped updating it and it couldn&rsquo;t handle 700 Mbps routing anyway. Now I&rsquo;m back to using the ISP-provided modem box. It works reasonably well, at least it can handle my upstream/downstream speeds. My building uses <a href="https://en.m.wikipedia.org/wiki/G.fast">G.fast to provide Gigabit access</a> through old phones lines up until the signal reaches the ONT in the cellar. I was quite sceptical of the technology initially, but so far I&rsquo;m really quite happy with the connectivity and reliability of the uplink.</p>
<p>The Pi and separate NAS box are gone and have been replaced by a custom-built 8L PC (nicknamed Takobia). The Pi ended up being too slow for some tasks (as it was the only &ldquo;capable&rdquo; device that was always on). Phasing it out would only make sense.</p>
<p>The NAS box was fine, but always waiting for it to turn on for a backup (and automatically shutting it down afterwards) proved to be a hassle. I also noticed that my storage footprint is pretty small and I don&rsquo;t really care too much about data redundancy. Having an off-site backup for important stuff is unavoidable anyway. Also, idle power consumption was a nightmare due to all the HDD (~50-60W even after powertop tuning, which translates to ~12.50€ a month when powered on 24/7). Shutting down HDDs between backups just wears them down (they hate heat cycles), so that was no good alternative.</p>
<h2 id="building-a-new-low-power-home-server">Building a new low-power home server</h2>
<p>The key requirements before building Takobia were</p>
<ul>
<li><strong>Small device footprint.</strong> It should fit into one IKEA Kallax square (33x33x39). I don&rsquo;t care too much about the noise at it sits in the home office room anyway.</li>
<li><strong>Always on.</strong> And since energy is costly these days, it should be low power (at least during idle).</li>
<li><strong>At least 4TB of really fast storage</strong>, capable of fully-utilizing at 25GbE connection during sequential reads. However, there is no need for high redundancy as this is for nice-to-have backups, but nothing essential.</li>
<li><strong>Reasonably cheap</strong>. I don&rsquo;t really have a need for enterprise-grade hardware (and I&rsquo;m fine with running memtest86 once in a while). Finding a chipset with ECC support is pretty costly for Intel, the situation is better on AMDs side of things but nah.</li>
<li><strong>Connectivity</strong>. A couple of USB ports are always sweet in case I opt to connect additional add-on devices later on (e.g. scanner). I also need a single x16 PCIe slot for a 25GbE networking card.</li>
</ul>
<p>The initial step was to settle on a specific platform. I&rsquo;ve had a great experience with the Ryzen 5950X in my workstation, however, it&rsquo;s not exactly energy saving. After looking at a number of idle energy consumption graphs online, I decided to take a shot again at Intel. The most recent generations of consumer Intel CPUs feature a Big-Little design (so we have low-power efficiency cores + high-power performance cores). With a little bit of tuning, we can heavily utilize the efficiency cores and avoid using the high-power cores altogether except for computationally heavy work.</p>
<p>The newest Raptor Lake CPUs i5 13400 and i5 13500 have both an excellent performance profile, feature a built-in GPU and a very low idle power footprint. The Passmark score of the <a href="https://www.cpubenchmark.net/cpu.php?id=4994&amp;cpu=Intel+Core+i5-13400">i5 13400 sits at 25275</a>, while the <a href="https://www.cpubenchmark.net/cpu.php?id=4993&amp;cpu=Intel+Core+i5-13500">i5 13500 sits at 32468</a>, so roughly 30% faster. I opted to go with the i5 13500 just in case I ever need the extra performance.</p>
<p>Next up was deciding on a case: Since my storage requirements strongly hinted towards a board with at least one M.2 w/ PCIe x4 connectivity, I ventured into the world of small-form factor PCs and discovered the ASRock DeskMeet B660. A perfect match: Cheap, motherboard + PSU were already included, 4 slots of DDR4 RAM (typically not available in that form factor) + even a PCIe 4.0 x16 extension slot. After I had the case and CPU, I just settled for readily available and cheap components to complete the build.</p>
<table>
  <thead>
      <tr>
          <th><strong>Component</strong></th>
          <th><strong>Price</strong></th>
      </tr>
  </thead>
  <tbody>
      <tr>
          <td>ASRock DeskMeet B660</td>
          <td>184,99€</td>
      </tr>
      <tr>
          <td>Intel Core i5 13500</td>
          <td>261,25€</td>
      </tr>
      <tr>
          <td>Lexar NM790 4TB</td>
          <td>195€</td>
      </tr>
      <tr>
          <td>bequiet! MC1</td>
          <td>10,90€</td>
      </tr>
      <tr>
          <td>Thermalright AXP90-X47 Full</td>
          <td>37,90€</td>
      </tr>
      <tr>
          <td>ARCTIC MX4</td>
          <td>5,49€</td>
      </tr>
      <tr>
          <td>2x Kingston KVR32N22D8/32</td>
          <td>136€</td>
      </tr>
      <tr>
          <td><strong>Total</strong></td>
          <td><strong>830.53€</strong></td>
      </tr>
  </tbody>
</table>
<p>After tuning idle energy consumption, I&rsquo;ve arrived at about 26W idle power consumption. As my energy price is fixed for the next 12 months at 0.2887€, I expect about 65€ in terms of energy costs per year. Assuming I can turn down my existing rented VPS instances (saving me 17.58€ per month) and move that workload over to Takobia, this will yield about 150€ in savings per year. In the case that this machine keeps running as long as its predecessor did (over 10 years), the savings will actually exceed the cost of buying the PC components in the first place.</p>
<p>For 25GbE networking <a href="https://network.nvidia.com/files/doc-2020/pb-connectx-4-lx-en-card.pdf">I use two Mellanox MCX4121A-ACAT</a> sourced from Ebay for 69€ a piece interconnected via <a href="https://www.fs.com/products/65851.html?attribute=9351&amp;id=2017480">an off-the-shelf SFP28 DAC cable</a> for just over 30€. The fast interconnect enables Takobia to serve as a very fast storage extension for my main workstation.</p>
<h2 id="software-stack">Software stack</h2>
<p>Takobia uses <a href="https://github.com/lnsp/sox">sox (which was called VirtM up until recently)</a>, a pretty web UI I built around libvirtd. It allows me to quickly turn VMs up and down, just as I need them and I can easily extend it with all the features I require myself. I got the idea to built something like sox from DigitalOcean as they (at least in the past) have been providing most of their machine management on top of libvirtd as well.</p>
<p>I already mentioned sox in the infra update last year, however, I recognize now that the project may require some rescoping (so I actually get around to implement some of the features I want). I&rsquo;ll most likely drop anything that is required for cluster use as my only use case for now is a single machine anyway. Anyway, I&rsquo;ll need to polish the UI and add some must-have features like SSH from the web UI, better observability and machine resizing. As mentioned above, the VMs are mostly there to take over the workload from Hetzner (which is mostly <a href="https://valar.dev">running Valar</a>).</p>
<p>Otherwise, Takobia will end up taking over <a href="https://coredns.io">CoreDNS</a> + <a href="https://wiki.archlinux.org/title/dnsmasq">dnsmasq DHCP service</a> from the Raspberry Pi. I also run a little tool called <code>dnsmasq-lth</code> which generates <code>hosts</code> files from <code>dnsmasq</code> leases. To provide network-accessable file &amp; software repository storage, Takobia runs <code>smbd</code> (with additional customizations to enable macOS Time Machine backups) and a small <code>gitea</code> instance. Back in 2020, I also had the old NAS store a basic copy of accessible sites on the WWW (mostly Wikipedia + TED talks). This was due to the unreliable ISP, nowadays 4G reception in my apartment is good enough thus I&rsquo;ll drop the offline mirror support.</p>
<h2 id="whats-next">What&rsquo;s next?</h2>
<p>As more of my devices have support for more recent Wifi standards, I&rsquo;ll have a look into upgrading this area. I&rsquo;d love to have my Macbook be able to access the file-storage mentioned above with more than 1 Gbps over WiFi. To make this possible, I&rsquo;ll have to find an access point which supports cable-based connectivity at these speeds. There are a couple of 2.5GbE APs around at reasonable prices, e.g. the TP-Link Omada EAP670 AX5400, but anything beyond 2.5GbE is still quite exotic.</p>
]]></content></entry><entry><title type="html">Your Let&amp;#39;s Encrypt certificate may slow you down, but you can fix that!</title><link href="https://blog.espe.tech/posts/letsencrypt-may-slow-you-down/"/><id>https://blog.espe.tech/posts/letsencrypt-may-slow-you-down/</id><published>2022-02-10T00:00:07+01:00</published><content type="html"><![CDATA[<p>First, a bit of context: I run a side-project called Valar, which is kind of a cluster-scale systemd-socket-activation container engine. I&rsquo;m currently focusing on performance improvements and one of my targets was the proxy component. It terminates TLS connections and hands the HTTP requests off to the respective handler.</p>
<p>As I did some load testing, I ran into the fact that my proxy spend about 70% of its CPU time multiplying some <code>big.Int</code> for the TLS handshake, which seemed kind of excessive. I published <a href="https://github.com/lnsp/go-tls-benchmark">a little demo repository</a> where you can try it yourself.</p>
<p>When looking at a profile for a 10s load test with RSA private keys (4096 bit)</p>
<div class="highlight"><pre tabindex="0" style="color:#ebdbb2;background-color:#282828;-moz-tab-size:4;-o-tab-size:4;tab-size:4;-webkit-text-size-adjust:none;"><code class="language-text" data-lang="text"><span style="display:flex;"><span>Showing nodes accounting for 12.89s, 92.01% of 14.01s total
</span></span><span style="display:flex;"><span>Dropped 218 nodes (cum &lt;= 0.07s)
</span></span><span style="display:flex;"><span>Showing top 10 nodes out of 69
</span></span><span style="display:flex;"><span>      flat  flat%   sum%        cum   cum%
</span></span><span style="display:flex;"><span>    10.34s 73.80% 73.80%     10.34s 73.80%  math/big.addMulVVW
</span></span><span style="display:flex;"><span>     1.75s 12.49% 86.30%     12.22s 87.22%  math/big.nat.montgomery
</span></span><span style="display:flex;"><span>     0.20s  1.43% 87.72%      0.20s  1.43%  math/big.mulAddVWW
</span></span><span style="display:flex;"><span>     0.13s  0.93% 88.65%      0.13s  0.93%  math/big.subVV
</span></span></code></pre></div><p><strong>87%!</strong> Just for setting up a secure connection. What about ECDSA with P-256?</p>
<div class="highlight"><pre tabindex="0" style="color:#ebdbb2;background-color:#282828;-moz-tab-size:4;-o-tab-size:4;tab-size:4;-webkit-text-size-adjust:none;"><code class="language-text" data-lang="text"><span style="display:flex;"><span>Showing nodes accounting for 1590ms, 42.06% of 3780ms total
</span></span><span style="display:flex;"><span>Dropped 170 nodes (cum &lt;= 18.90ms)
</span></span><span style="display:flex;"><span>Showing top 10 nodes out of 308
</span></span><span style="display:flex;"><span>      flat  flat%   sum%        cum   cum%
</span></span><span style="display:flex;"><span>     690ms 18.25% 18.25%      690ms 18.25%  vendor/golang.org/x/crypto/curve25519.ladderstep
</span></span><span style="display:flex;"><span>     210ms  5.56% 23.81%      210ms  5.56%  crypto/sha256.block
</span></span><span style="display:flex;"><span>     150ms  3.97% 27.78%      150ms  3.97%  runtime.futex
</span></span><span style="display:flex;"><span>     100ms  2.65% 30.42%      660ms 17.46%  runtime.mallocgc
</span></span><span style="display:flex;"><span>      80ms  2.12% 32.54%      470ms 12.43%  runtime.gcDrain
</span></span><span style="display:flex;"><span>      80ms  2.12% 34.66%      120ms  3.17%  syscall.Syscall
</span></span></code></pre></div><p>18%! I guess that&rsquo;s better. Finally, what about Ed25519?</p>
<div class="highlight"><pre tabindex="0" style="color:#ebdbb2;background-color:#282828;-moz-tab-size:4;-o-tab-size:4;tab-size:4;-webkit-text-size-adjust:none;"><code class="language-text" data-lang="text"><span style="display:flex;"><span>Showing nodes accounting for 1640ms, 45.81% of 3580ms total
</span></span><span style="display:flex;"><span>Dropped 156 nodes (cum &lt;= 17.90ms)
</span></span><span style="display:flex;"><span>Showing top 10 nodes out of 272
</span></span><span style="display:flex;"><span>      flat  flat%   sum%        cum   cum%
</span></span><span style="display:flex;"><span>     690ms 19.27% 19.27%      690ms 19.27%  vendor/golang.org/x/crypto/curve25519.ladderstep
</span></span><span style="display:flex;"><span>     280ms  7.82% 27.09%      280ms  7.82%  crypto/sha256.block
</span></span><span style="display:flex;"><span>     120ms  3.35% 30.45%      120ms  3.35%  runtime.futex
</span></span><span style="display:flex;"><span>     110ms  3.07% 33.52%      110ms  3.07%  runtime.procyield
</span></span></code></pre></div><p>19%! It seems to use the same optimization as the ECDSA one.</p>
<div class="highlight"><pre tabindex="0" style="color:#ebdbb2;background-color:#282828;-moz-tab-size:4;-o-tab-size:4;tab-size:4;-webkit-text-size-adjust:none;"><code class="language-text" data-lang="text"><span style="display:flex;"><span>418_623_557_911      cycles       # RSA
</span></span><span style="display:flex;"><span> 21_593_305_599      cycles       # ECDSA
</span></span><span style="display:flex;"><span> 21_083_496_865      cycles       # ED25519
</span></span></code></pre></div><p><strong>So we save about 95% of CPU cycles when we switch from RSA to ECDSA</strong> when using Go&rsquo;s TLS package. ECDSA is also widely supported, especially compared to Ed25519. In the case of my original proxy problem, re-issueing the certificates with new private keys increased throughput by about 30% in high-load scenarios and the bottleneck is now another system component.</p>
<h2 id="the-psa-part">The PSA part</h2>
<p>For many services, RSA is still the default. I ran into the original issue because <strong>my Let&rsquo;s Encrypt certificates all used RSA private keys</strong>. You can switch to ECDSA by simply supplying <code>--key-type ecdsa</code> <a href="https://eff-certbot.readthedocs.io/en/stable/using.html#changing-existing-certificates-from-rsa-to-ecdsa">as described in the certbot docs</a>. Popular tools like the reverse-proxy <a href="https://github.com/traefik/traefik">traefik</a> <strong>default to <a href="https://github.com/traefik/traefik/blob/5780dc2b1556517e485be277c58d99b80485c80b/pkg/provider/acme/provider.go#L50">using RSA private keys</a></strong>, unnecessarily slowing down your system and prolonging TLS handshakes. So in case you don&rsquo;t explicitly serve folks which prefer to use outdated crypto, you should probably switch.</p>
]]></content></entry><entry><title type="html">Tech infra at home / 2022 edition</title><link href="https://blog.espe.tech/posts/tech-at-home-2022/"/><id>https://blog.espe.tech/posts/tech-at-home-2022/</id><published>2022-02-08T23:13:00+01:00</published><content type="html"><![CDATA[<p>This is an update on <a href="https://blog.espe.tech/posts/tech-at-home-2020/">a previous post on the technical infrastructure I run at home</a>. This post will be similarly structured to its predecessor. I will start with giving a detailed description of the base network, continue with my storage setup and finish with compute.</p>
<h3 id="tier-i-physical-layout--network">Tier I: Physical layout &amp; network</h3>


<a href="https://blog.espe.tech/posts/tech-at-home-2022/layout.png"><img
  srcset="https://blog.espe.tech/posts/tech-at-home-2022/layout_hu_f830b8d8baa20080.png 2x,https://blog.espe.tech/posts/tech-at-home-2022/layout_hu_363a11e9f0962699.png 3x"
  src="https://blog.espe.tech/posts/tech-at-home-2022/layout_hu_1b0f747233b6ae1c.png"
  
  style="border: 1px solid #000; width: 100%"
  
  loading="lazy"></a>


<p><strong>Router:</strong> Two years after my initial post I&rsquo;m still happily <a href="https://www.ui.com/edgemax/edgerouter-x/">using my EdgeRouter-X</a>.
It works fine for my needs, although I&rsquo;m probably gonna switch to a self-built router at some point due to upgrading to 10G/25G Ethernet.
Running 10G at home was quite pricey just a couple years ago, but these days you can find older 10GBit cards like the Mellanox ConnectX-3 cards for less than 50€.</p>
<p><strong>Wireless AP:</strong> In the last post I talked about the old travel-size Wi-Fi AP I was using.
Since then, I&rsquo;ve switched to <a href="https://store.ui.com/products/unifi-flexhd">using a Ubiquiti FlexHD</a> allowing me to get up to 1.7 Gbps throughput between devices on Wi-Fi.
Of course, devices are throttled to 1 Gbps due to Ethernet when accessing wire-bound devices or the internet gateway.</p>
<p><strong>Switching:</strong> I am still running some super low-cost low-energy 5-Port Netgear switch (GS105A) I got a couple of years ago for less than 20€.</p>
<p><strong>WAN Access:</strong> I don&rsquo;t get a public IPv4 (and IPv6 doesn&rsquo;t work at all). I also don&rsquo;t want to expose anything from my home network publicly on the internet. Luckily, I discovered <a href="https://tailscale.com">the Tailscale project</a> some time ago. The utility they provide for free is truly amazing. Thanks to Tailscale, it doesn&rsquo;t really matter if I&rsquo;m at home or work remotely, I&rsquo;m guaranteed to have access to any machine on my home network anyway. This in combination with Wake-On-Lan on the larger machines makes for a pretty efficient compute-on-demand setup I will talk about further in the T3 section.</p>
<p><strong>10GbE P2P:</strong> I have a single 10GbE connection running from my main workstation to my storage server. This is mainly to speed things up in case my workstation needs to access large datasets or perform backups. I used some cheap ConnectX-3 EN CX331A NICs I got on Ebay as well as the most basic 10G SFP+ transceivers from <a href="https://fs.com">FS.com</a> I could get my hands on. I guess I could&rsquo;ve used a DAC cable as well, but fiber is just far more flexible and fun.</p>
<p><strong>DNS:</strong> My Raspberry runs a CoreDNS instance serving as both resolver as well as nameserver for my home network DNS zone. It serves different IPs for the same zone depending which interface requests the information.
For example, when a DNS request <code>dig</code>s for the <code>virtm.home.espe.tech</code> entry from the Tailscale link, the CoreDNS server will respond with the Tailscale IP of my storage server.
When the same request comes in from the local LAN port, it will respond with the local subnet IP from the <code>192.168.0.1/24</code> range.</p>
<blockquote>
<p>You may ask <em>Why CoreDNS?</em>
Well, It&rsquo;s easy to write custom plugins for. This will be useful later when I want to add automatic DNS entry generation for my virtual machines.</p>
</blockquote>
<h3 id="tier-ii-storage--media">Tier II: Storage &amp; media</h3>
<p><strong>NAS:</strong> Back in 2020 I used a second hand Synology DS213 from Ebay. It did fine most of the time, but sometimes my TimeMachine backups wouldn&rsquo;t even finish because operations timed out (<em>which was kind of annoying!</em>).
At the end of 2020, I replaced my old workstation (a very reliable Intel 3770K) with an Ryzen 5950X-based platform, so the my 3770K is now &ldquo;busy&rdquo; serving files. It exposes both AFS and SMB shares.</p>
<p>I migrated all the old <code>mdraid</code> off to a new ZFS-based storage array made out of three 4TB IronWolf RED disks. <em>I always thought that Synology uses some sort of custom RAID system? But no, it&rsquo;s just a Linux software raid.</em></p>
<p>Performance wise, I&rsquo;m pretty happy.</p>
<div class="highlight"><pre tabindex="0" style="color:#ebdbb2;background-color:#282828;-moz-tab-size:4;-o-tab-size:4;tab-size:4;-webkit-text-size-adjust:none;"><code class="language-bash" data-lang="bash"><span style="display:flex;"><span><span style="color:#928374;font-style:italic"># dd if=/dev/zero of=test1 bs=2G count=1 conv=fsync</span>
</span></span><span style="display:flex;"><span><span style="color:#d3869b">2147479552</span> bytes <span style="color:#fe8019">(</span>2.1 GB, 2.0 GiB<span style="color:#fe8019">)</span> copied, 12.2618 s, <span style="color:#d3869b">175</span> MB/s
</span></span><span style="display:flex;"><span><span style="color:#928374;font-style:italic"># dd if=test1 of=/dev/zero bs=2G count=1 (after cache flush)</span>
</span></span><span style="display:flex;"><span><span style="color:#d3869b">2147479552</span> bytes <span style="color:#fe8019">(</span>2.1 GB, 2.0 GiB<span style="color:#fe8019">)</span> copied, 8.44784 s, <span style="color:#d3869b">254</span> MB/s
</span></span></code></pre></div><p>The performance is roughly equal to single disk speeds which is totally fine for me.
It&rsquo;s good enough for backups and the occasional dataset scans.</p>
<p>The storage server keeps</p>
<ul>
<li>backups of my other devices</li>
<li>regularly updated GDPR takeout data from major cloud services like Google and Apple</li>
<li>mirror of debian testing repository (all of my Linux devices are Debian based, speeds things up quite a bit)</li>
<li>up-to-date archives of important documentation and services (like Wikipedia)</li>
<li>some datasets I keep for private project purposes</li>
</ul>
<p>Earlier this year, <strong>my gateway connection got interrupted for almost a week.</strong> Having stored offline copies of some useful sites like Wikipedia was a lifesafer during that time.</p>
<blockquote>
<p>I also noticed that YouTube is probably the biggest time-waste I use during the day. I deinstalled the app from my phone, which resulted in two things: YouTube is now ad-free thanks to ad-blockers. I watch less vaguely interesting videos.</p>
</blockquote>
<p>ZFS allows me to do this without a lot of maintenance. I&rsquo;ve read that it&rsquo;s actually NOT recommended to use non-ECC RAM with ZFS due to checksumming,
but so far my datasets haven&rsquo;t been completely ruined because ZFS decides to rewrite them due to checksum mismatch.
Although I should probably monitor for this. The block-level compression feature works pretty fine for me too and saves me around 20% of disk space.</p>
<p><strong>Raspberry:</strong> The Pi is the only non-(router|switch|home-automation) device that is always on.
It provides AirPlay using <code>shareplay</code> and <a href="https://www.hifiberry.com/">the HifiBerry DAC platform</a>.
The only real issue I have with this setup is that Windows does not support AirPlay streaming.
The Pi also hosts a Gitea instance for storing some repository mirroring from GitHub as well as throwaway repository storage.
It also provides a simple link shortening service reachable under <code>go/</code>.</p>
<h3 id="tier-iii-compute">Tier III: Compute</h3>
<p>I actually got around to build my own little compute platform called <code>virtm</code>. It runs on the aforementioned storage server.
I will probably open-source it in the future, its feature set is quite minimal but for my core use cases it works pretty well.
It exposes both a web-based UI as well as a gRPC API with an accompanying command line client.</p>
<p>It uses <code>libvirt</code> with <code>qemu-kvm</code> to manage virtual machines and is tightly integrated into my networking setup.
Referring back to my old post, I wanted</p>
<table>
  <thead>
      <tr>
          <th>Requirement</th>
          <th>Status</th>
      </tr>
  </thead>
  <tbody>
      <tr>
          <td>Flexible networking</td>
          <td>every VM is reachable locally as well as over Tailscale</td>
      </tr>
      <tr>
          <td>Low configuration and maintenance overhead</td>
          <td>few configuration changes therefore low maintainance</td>
      </tr>
      <tr>
          <td>Support for multiple tenants for sharing with friends</td>
          <td>no, but they can use <a href="https://valar.dev">Valar</a> if it fits their use case</td>
      </tr>
      <tr>
          <td>Auto-assign DNS records</td>
          <td>no, but shouldn&rsquo;t be a big problem</td>
      </tr>
      <tr>
          <td>Only-run-what-you-use</td>
          <td>solved by wake on lan</td>
      </tr>
  </tbody>
</table>
<p>I can create new Debian-based Virtual Machines with just a couple of clicks. After confirming, VirtM generates a new qcow2 image for my VM, customizes it and starts the instance.</p>

<a href="https://blog.espe.tech/posts/tech-at-home-2022/virtm-create.webm" style="box-shadow: none;"><video
  
  style="width: 100%; border: 1px solid #000"
  
  controls><source src="https://blog.espe.tech/posts/tech-at-home-2022/virtm-create.webm"></video></a>
<p>It&rsquo;s a pretty solid user flow so far. Starting, stopping and tearing down VMs works well, too. I&rsquo;ll look into</p>
<ul>
<li>cross-machine private networks</li>
<li>online migration</li>
<li>displaying CPU, memory and disk usage in the UI</li>
<li>easy SSH sessions via web UI or CLI (something along <code>virtm ssh [machine]</code>)
next.</li>
</ul>
<p>I will post more information on VirtM in the future, so stay tuned and <a href="/feed.xml">subscribe to my Atom feed</a>.</p>
]]></content></entry><entry><title type="html">Technical infrastructure at home</title><link href="https://blog.espe.tech/posts/tech-at-home-2020/"/><id>https://blog.espe.tech/posts/tech-at-home-2020/</id><published>2020-02-03T12:00:00+01:00</published><content type="html"><![CDATA[<p>Today I wondered what makes a good computing infrastructure setup? Of course, the context matters here. Does one measure good infrastructure in terms of &ldquo;enterprise-grade&rdquo; or prefer just a well working home setup? Or can one actually transfer ideas from enterprises to its smaller scale sister?</p>
<blockquote>
<p>Just to clarify: I will focus on the environment at home, since these kind of fast-moving thought experiments don&rsquo;t go well with enterprises.</p>
</blockquote>
<h2 id="what-does-one-require">What does one require?</h2>
<p>I had to think about what kind of requirements do I have? Which kind of infrastructure do I use at home?</p>
<ol>
<li>Basic internet access for</li>
</ol>
<ul>
<li>Performing study-related task</li>
<li>Entertainment</li>
<li>Whatever you need the internet for</li>
<li>Both my desktop and mobile devices</li>
</ul>
<ol start="2">
<li>Basic local infrastructure for
<ul>
<li>Performing backups of both my desktop and mobile machine</li>
<li>Streaming audio to my analogue HiFi system</li>
</ul>
</li>
<li>Advanced local infrastructure for
<ul>
<li>Running and testing computing projects</li>
<li>Learning about the latest hype cycle subject</li>
<li>Fun and profit</li>
</ul>
</li>
</ol>
<p>Another important global requirement is energy-efficiency: power costs are quite high in Germany.</p>
<h2 id="requirement-decomposition">Requirement decomposition</h2>
<p>Let&rsquo;s break down the different tiers into what should actually be accomplished and how.</p>
<h3 id="tier-1-basic-internet-access">Tier 1: Basic internet access</h3>
<ul>
<li>DHCP service</li>
<li>Traffic routing/packet forwarding to my ISP</li>
<li>Local DNS resolver</li>
<li>Wireless- and Ethernet-based network ports to connect my devices to</li>
</ul>
<p>Tier 1 is instantly solved by tons of off-the-shelf components also called <em>Home routers</em>.
I opted for <a href="https://www.ui.com/edgemax/edgerouter-x/">a very basic one by Ubiquiti</a>
and it actually does it job very reliably, no hiccups yet. Sadly,
I can&rsquo;t really say that about my WiFi access point (also why I&rsquo;m not listing it here,
it&rsquo;s running OpenWrt and branded as a travel router). Since I&rsquo;ve been very satisfied
with my current Ubiquiti router, I have been looking
<a href="https://unifi-flexhd.ui.com">into the UniFi AP FlexHD</a>, which is still quite pricy,
but has an awesome form-factor, looks good on a desk and is powered via POE,
or <a href="https://www.ui.com/unifi/unifi-ap-ac-lite/">UniFi AP AC Lite</a>, which is less expensive, a bit slower on 5 GHz and
can be powered via POE passthrough by the ER-X.</p>
<h3 id="tier-2-basic-local-infrastructure">Tier 2: Basic local infrastructure</h3>
<ul>
<li>NFS / TimeMachine storage server</li>
<li>AirPlay-supporting digital-to-analogue interface</li>
</ul>
<p>The first requirement is accomplished by my Synology DS213+ I grabbed
from Ebay (and modded a bit by replacing the default fan). The AirPlay
streaming service is provided by an Raspberry Pi 4 with
<a href="https://www.hifiberry.com/shop/boards/hifiberry-dac-pro/">a Hifiberry extension board</a>
and an awesome tool called <a href="https://www.github.com/mikebrady/shairport-sync"><code>shairport-sync</code></a>.</p>
<p>The only problem with the current configuration is that backing up my Mac over WiFi is quite slow due the aforementioned access point.</p>
<h3 id="tier-3-advanced-local-infrastructure">Tier 3: Advanced local infrastructure</h3>
<p>I have two machines that serve as the basis for the compute analysis with a total of 16 Cores, 32 GB of RAM and about 1TB storage.</p>
<ul>
<li>Dynamically allocate storage and compute as needed</li>
<li>Flexible networking</li>
<li>Low configuration and maintenance overhead</li>
<li>Support for multiple tenants for sharing with friends and family</li>
<li>Setting up reference routes in the local network using DNS</li>
<li>Only-run-what-you-use, when no compute is required it should not use a lot of power</li>
</ul>
<p>The only thing reliably working on this list is the reference route aspect, meaning my DNS resolver on my home network is split from the ER-X router and also running on the RPI mentioned in the T2 section. The RPI runs a CoreDNS instance sourcing configuration from local storage and a frontend application I built <a href="https://www.github.com/lnsp/koala">called Koala</a>.</p>
<p><strong>Dynamically allocating storage and compute</strong> as needed
can be solved either from an application perspective, where I
just supply application blueprints to my compute environment, or
dynamic provisioning of virtual machines, which is more flexible
but also complicated. If one would choose dynamic application
provisioning I guess you could probably just set up a Kubernetes
cluster. But since running virtual machines is fun (and also more flexible,
did I mention that?), a good off-the-shelf solution <a href="https://www.proxmox.com/en/">seems to be Proxmox</a>.
A few years back, I also tried to built a basic provisioning frontend but never finished it.
Maybe its time <a href="https://www.github.com/lnsp/fjell">to look into fjell</a> again, since I would love to have a more refined DigitalOcean-like user experience at home.</p>
<p><strong>Flexible networking</strong> is a hard one to solve. Managing virtual networks via VXLAN manually has been a horrible task in my experience, but maybe Proxmox can help me with that too.</p>
<p><strong>Multi-tenancy</strong> should I be able to accomplish by setting up identity
provider infrastructure. I looked into the <a href="https://github.com/ory/hydra">ORY ecosystem</a> but
it seemed quite heavyweight and a bit too much for the use case I&rsquo;m looking
for here. At some point <a href="https://github.com/dexidp/dex">I found dex</a>, a project by
the folks from CoreOS (now RedHat now IBM). While I still need to look
into the templating and theming (&lsquo;cause consistent user experience, duh), I have tried
to set it up with a local version of Koala and it seemed to work quite well.
And the connector interface seems fairly straightforward.</p>
<p><strong>Only-run-what-you-use</strong> should probably be renamed to power over ethernet.</p>
<p><strong>Low maintenance overhead</strong> can probably quite easy since I got only 2 machines, the possiblity of any kind of hardware failure is quite low compared to any large-scale system.</p>
<h2 id="summary">Summary</h2>
<p>I should probably go buy a better WiFi access point. And maybe building a DigitalOcean-like interface for provisioning virtual machines, networks and storage at home is worth it?</p>
]]></content></entry><entry><title type="html">Playing around with Kotlin</title><link href="https://blog.espe.tech/posts/kotlin/"/><id>https://blog.espe.tech/posts/kotlin/</id><published>2019-04-28T12:00:00+01:00</published><content type="html"><![CDATA[<p>A small disclaimer at the beginning: while I have some background in Java, I would never consider myself a superb Java developer. In the recent years I mainly opted for Go to get stuff done, maybe missing out on some of the more interesting programming language trends. This is the main reason I decided to learn Kotlin: dipping around in new concepts. I chose Kotlin because of the recent <a href="https://insights.stackoverflow.com/survey/2019">2019 Stack Overflow survey</a>.
By developers Kotlin is ranked at the 4th rank of most loved programming languages. Since I know Python (mainly for ML use), have learned a bit of Rust (but I found it way to verbose) and written quite a bit of TypeScript in combination with Vue.js web framework; I decided to investigate why exactly Kotlin is so popular.</p>
<h2 id="getting-kotlin-ready">Getting Kotlin ready</h2>
<p>I found out that there is a <a href="https://play.kotlinlang.org">Kotlin Playground</a> very similar to the <a href="https://play.golang.org">Golang Playground</a>. It works pretty well and has an attached workshop site called <a href="https://play.kotlinlang.org/koans">Koans</a>. If you want to execute it on your own machine, I prefer to use IntelliJ by JetBrains just because the Kotlin support is outstanding (as JetBrains is the company behind Kotlin).</p>
<h2 id="hello-world">Hello, world!</h2>
<p>Because starting to learn a new language always begins with a greeting, we want to build a simple Hello-World program that outputs something to the command line.</p>
<div class="highlight"><pre tabindex="0" style="color:#ebdbb2;background-color:#282828;-moz-tab-size:4;-o-tab-size:4;tab-size:4;-webkit-text-size-adjust:none;"><code class="language-kotlin" data-lang="kotlin"><span style="display:flex;"><span><span style="color:#fe8019">fun</span> <span style="color:#fabd2f">main</span>(args: Array&lt;String&gt;) {
</span></span><span style="display:flex;"><span>  println(<span style="color:#b8bb26">&#34;Hello, World!&#34;</span>)
</span></span><span style="display:flex;"><span>}
</span></span></code></pre></div><p>As you instantly recognize, the Java heritage is strong in this one. Since <code>main</code> is a static method, we do not have to wrap it with a class, although I think the Kotlin compiler puts it in a wrapper later. You can instantly see one of the great joys of Kotlin, atleast for me as a Go developer: The verbosity of Java is nowhere found. If you do not believe me, this is the same program in Java.</p>
<div class="highlight"><pre tabindex="0" style="color:#ebdbb2;background-color:#282828;-moz-tab-size:4;-o-tab-size:4;tab-size:4;-webkit-text-size-adjust:none;"><code class="language-java" data-lang="java"><span style="display:flex;"><span><span style="color:#fe8019">public</span> <span style="color:#fe8019">class</span> Main {
</span></span><span style="display:flex;"><span>	<span style="color:#fe8019">public</span> <span style="color:#fe8019">static</span> <span style="color:#fabd2f">void</span> <span style="color:#fabd2f">main</span>(String<span style="color:#fe8019">[]</span> args) {
</span></span><span style="display:flex;"><span>		System.<span style="color:#b8bb26;font-weight:bold">out</span>.<span style="color:#b8bb26;font-weight:bold">println</span>(<span style="color:#b8bb26">&#34;Hello, World!&#34;</span>);
</span></span><span style="display:flex;"><span>	}
</span></span><span style="display:flex;"><span>}
</span></span></code></pre></div><p>Just by adding some Java objects to the global namespace, Kotlin has done wonders for developer productivity. This also can be seen when you want to do more complex things in Java like counting string occurences.</p>
<div class="highlight"><pre tabindex="0" style="color:#ebdbb2;background-color:#282828;-moz-tab-size:4;-o-tab-size:4;tab-size:4;-webkit-text-size-adjust:none;"><code class="language-java" data-lang="java"><span style="display:flex;"><span>List<span style="color:#fe8019">&lt;</span>String<span style="color:#fe8019">&gt;</span> myWords <span style="color:#fe8019">=</span> Arrays.<span style="color:#b8bb26;font-weight:bold">asList</span>(<span style="color:#b8bb26">&#34;hello&#34;</span>, <span style="color:#b8bb26">&#34;world&#34;</span>, <span style="color:#b8bb26">&#34;my&#34;</span>, <span style="color:#b8bb26">&#34;dude&#34;</span>, <span style="color:#b8bb26">&#34;world&#34;</span>);
</span></span><span style="display:flex;"><span><span style="color:#fabd2f">int</span> count <span style="color:#fe8019">=</span> 0;
</span></span><span style="display:flex;"><span><span style="color:#fe8019">for</span> (String word : myWords) {
</span></span><span style="display:flex;"><span>	<span style="color:#fe8019">if</span> (word.<span style="color:#b8bb26;font-weight:bold">equals</span>(<span style="color:#b8bb26">&#34;world&#34;</span>)) count<span style="color:#fe8019">++</span>;
</span></span><span style="display:flex;"><span>}
</span></span><span style="display:flex;"><span>System.<span style="color:#b8bb26;font-weight:bold">out</span>.<span style="color:#b8bb26;font-weight:bold">printf</span>(<span style="color:#b8bb26">&#34;world occurs %d times.\n&#34;</span>, count);
</span></span></code></pre></div><p>We can use lambda expressions and operations to shrink that block of code massively.</p>
<div class="highlight"><pre tabindex="0" style="color:#ebdbb2;background-color:#282828;-moz-tab-size:4;-o-tab-size:4;tab-size:4;-webkit-text-size-adjust:none;"><code class="language-kotlin" data-lang="kotlin"><span style="display:flex;"><span><span style="color:#fe8019">val</span> myWords = listOf(<span style="color:#b8bb26">&#34;hello&#34;</span>, <span style="color:#b8bb26">&#34;world&#34;</span>, <span style="color:#b8bb26">&#34;my&#34;</span>, <span style="color:#b8bb26">&#34;dude&#34;</span>, <span style="color:#b8bb26">&#34;world&#34;</span>)
</span></span><span style="display:flex;"><span><span style="color:#fe8019">val</span> count = myWords.count { <span style="color:#fe8019">it</span> <span style="color:#fe8019">==</span> <span style="color:#b8bb26">&#34;world&#34;</span> }
</span></span><span style="display:flex;"><span>println(<span style="color:#b8bb26">&#34;world occurs </span><span style="color:#b8bb26">$count</span><span style="color:#b8bb26"> times.&#34;</span>)
</span></span></code></pre></div><p>And it&rsquo;s perfectly readable and understandable. I am very pleased by the use of the  equality operator for structural equality therefore testing if the content is the same and not the reference. Don&rsquo;t worry, if you want to use reference equality there still is the <code>===</code> operator. Also if you do a <code>variable == null</code> check, it automatically gets extended to a <code>variable === null</code> expression.</p>
<h2 id="data-classes">Data classes</h2>
<p>But we are still missing out on the real good stuff, a concept called data classes. Data classes are the true boilerplate killers in Kotlin, at least judging from my experience in Java. A typical <code>Person</code> class in Java with read-only properties would look something like the following:</p>
<div class="highlight"><pre tabindex="0" style="color:#ebdbb2;background-color:#282828;-moz-tab-size:4;-o-tab-size:4;tab-size:4;-webkit-text-size-adjust:none;"><code class="language-java" data-lang="java"><span style="display:flex;"><span><span style="color:#fe8019">public</span> <span style="color:#fe8019">class</span> Person {
</span></span><span style="display:flex;"><span>	<span style="color:#fe8019">private</span> <span style="color:#fe8019">final</span> String firstName;
</span></span><span style="display:flex;"><span>	<span style="color:#fe8019">private</span> <span style="color:#fe8019">final</span> String lastName;
</span></span><span style="display:flex;"><span>	
</span></span><span style="display:flex;"><span>	<span style="color:#fe8019">public</span> <span style="color:#fabd2f">Person</span>(String firstName, String lastName) {
</span></span><span style="display:flex;"><span>		<span style="color:#fe8019">this</span>.<span style="color:#b8bb26;font-weight:bold">firstName</span> <span style="color:#fe8019">=</span> firstName;
</span></span><span style="display:flex;"><span>		<span style="color:#fe8019">this</span>.<span style="color:#b8bb26;font-weight:bold">lastName</span> <span style="color:#fe8019">=</span> lastName;
</span></span><span style="display:flex;"><span>	}
</span></span><span style="display:flex;"><span>	
</span></span><span style="display:flex;"><span>	<span style="color:#fe8019">public</span> String <span style="color:#fabd2f">getFirstName</span>() {
</span></span><span style="display:flex;"><span>		<span style="color:#fe8019">return</span> firstName;
</span></span><span style="display:flex;"><span>	}
</span></span><span style="display:flex;"><span>	
</span></span><span style="display:flex;"><span>	<span style="color:#fe8019">public</span> String <span style="color:#fabd2f">getLastName</span>() {
</span></span><span style="display:flex;"><span>		<span style="color:#fe8019">return</span> lastName;
</span></span><span style="display:flex;"><span>	}
</span></span><span style="display:flex;"><span>}
</span></span></code></pre></div><p>The same, but different in Kotlin looks like this.</p>
<div class="highlight"><pre tabindex="0" style="color:#ebdbb2;background-color:#282828;-moz-tab-size:4;-o-tab-size:4;tab-size:4;-webkit-text-size-adjust:none;"><code class="language-kotlin" data-lang="kotlin"><span style="display:flex;"><span><span style="color:#fe8019">data</span> <span style="color:#fe8019">class</span> Person(<span style="color:#fe8019">val</span> firstName: String, <span style="color:#fe8019">val</span> lastName: String)
</span></span></code></pre></div><p>Voilá, nothing more to it. Same method, same functionality. I begin to grasp why Kotlin is a loved programming language. It feels a lot like Swift but without the Objective-C legacy bullshit.</p>
]]></content></entry><entry><title type="html">Exposing services on Kubernetes using Ingress</title><link href="https://blog.espe.tech/posts/kubernetes-ingress/"/><id>https://blog.espe.tech/posts/kubernetes-ingress/</id><published>2018-08-11T12:00:00+01:00</published><content type="html"><![CDATA[<p>In my last blog post I talked about setting up your own Kubernetes cluster at home.
Since we don&rsquo;t run our cluster on a big cloud platform, we have no access to comfortable
tools like a built-in load balancer.</p>
<h2 id="time-to-go-ashore">Time to go ashore</h2>
<p>But, don&rsquo;t despair! We can deploy our own load balancer using the Kubernetes Ingress object.
It allows us to define routing rules and use a backend of our choice that uses these rules to
route traffic to our cluster. And the most exiting thing: to build an Ingress controller is really simple.</p>
<p>But, since I don&rsquo;t want to get into building your own controller yet (at least this time), we will use a
proven ecosystem. Luckily, the <code>nginx-ingress</code> is maintained by the Kubernetes project.</p>
<h2 id="curl-and-apply">cURL and apply!</h2>
<p>Setting up the basic infrastructure is once again copying and pasting commands.</p>
<div class="highlight"><pre tabindex="0" style="color:#ebdbb2;background-color:#282828;-moz-tab-size:4;-o-tab-size:4;tab-size:4;-webkit-text-size-adjust:none;"><code class="language-bash" data-lang="bash"><span style="display:flex;"><span><span style="color:#928374;font-style:italic"># For more information, see https://kubernetes.github.io/ingress-nginx/deploy/#mandatory-command</span>
</span></span><span style="display:flex;"><span>kubectl apply -f https://raw.githubusercontent.com/kubernetes/ingress-nginx/master/deploy/mandatory.yaml
</span></span></code></pre></div><p>Now our backend should be configured successfully. Maybe you already noticed that we did not expose anything yet, no IP to access, nothing. That is mostly because the frontend service is custom for each cluster deployment.</p>
<div class="highlight"><pre tabindex="0" style="color:#ebdbb2;background-color:#282828;-moz-tab-size:4;-o-tab-size:4;tab-size:4;-webkit-text-size-adjust:none;"><code class="language-bash" data-lang="bash"><span style="display:flex;"><span><span style="color:#fabd2f">echo</span> &gt; ingress-nginx.yaml <span style="color:#b8bb26">&lt;&lt;EOF
</span></span></span><span style="display:flex;"><span><span style="color:#b8bb26">apiVersion: v1
</span></span></span><span style="display:flex;"><span><span style="color:#b8bb26">kind: Service
</span></span></span><span style="display:flex;"><span><span style="color:#b8bb26">metadata:
</span></span></span><span style="display:flex;"><span><span style="color:#b8bb26">  name: ingress-nginx
</span></span></span><span style="display:flex;"><span><span style="color:#b8bb26">  namespace: ingress-nginx
</span></span></span><span style="display:flex;"><span><span style="color:#b8bb26">spec:
</span></span></span><span style="display:flex;"><span><span style="color:#b8bb26">  externalTrafficPolicy: Cluster
</span></span></span><span style="display:flex;"><span><span style="color:#b8bb26">  ports:
</span></span></span><span style="display:flex;"><span><span style="color:#b8bb26">  - name: http
</span></span></span><span style="display:flex;"><span><span style="color:#b8bb26">    port: 80
</span></span></span><span style="display:flex;"><span><span style="color:#b8bb26">    protocol: TCP
</span></span></span><span style="display:flex;"><span><span style="color:#b8bb26">    targetPort: 80
</span></span></span><span style="display:flex;"><span><span style="color:#b8bb26">  - name: https
</span></span></span><span style="display:flex;"><span><span style="color:#b8bb26">    port: 443
</span></span></span><span style="display:flex;"><span><span style="color:#b8bb26">    protocol: TCP
</span></span></span><span style="display:flex;"><span><span style="color:#b8bb26">    targetPort: 443
</span></span></span><span style="display:flex;"><span><span style="color:#b8bb26">  selector:
</span></span></span><span style="display:flex;"><span><span style="color:#b8bb26">    app: ingress-nginx
</span></span></span><span style="display:flex;"><span><span style="color:#b8bb26">  sessionAffinity: None
</span></span></span><span style="display:flex;"><span><span style="color:#b8bb26">  type: NodePort
</span></span></span><span style="display:flex;"><span><span style="color:#b8bb26">  externalIPs:
</span></span></span><span style="display:flex;"><span><span style="color:#b8bb26">    - &lt;your-master-ip&gt;
</span></span></span><span style="display:flex;"><span><span style="color:#b8bb26">EOF</span>
</span></span><span style="display:flex;"><span>kubectl apply -f ingress-nginx.yaml
</span></span></code></pre></div><p>Remember to replace the external IP with your own master node IP. If you have your own DNS running (or this is a public cluster), I recommend to point add a A record to it.</p>
<h2 id="exposing-our-blog">Exposing our blog</h2>
<p>Let&rsquo;s assume you have your blog running on Kubernetes and exposed it using a Service called <code>blog</code>. To expose this application using your new <code>nginx-ingress</code>,
you just need to add the routing rules to your cluster.</p>
<div class="highlight"><pre tabindex="0" style="color:#ebdbb2;background-color:#282828;-moz-tab-size:4;-o-tab-size:4;tab-size:4;-webkit-text-size-adjust:none;"><code class="language-bash" data-lang="bash"><span style="display:flex;"><span><span style="color:#fabd2f">echo</span> &gt; blog-ingress.yaml <span style="color:#b8bb26">&lt;&lt;EOF
</span></span></span><span style="display:flex;"><span><span style="color:#b8bb26">apiVersion: extensions/v1beta1
</span></span></span><span style="display:flex;"><span><span style="color:#b8bb26">kind: Ingress
</span></span></span><span style="display:flex;"><span><span style="color:#b8bb26">metadata:
</span></span></span><span style="display:flex;"><span><span style="color:#b8bb26">  name: blog
</span></span></span><span style="display:flex;"><span><span style="color:#b8bb26">  annotations:
</span></span></span><span style="display:flex;"><span><span style="color:#b8bb26">    kubernetes.io/ingress.class: nginx
</span></span></span><span style="display:flex;"><span><span style="color:#b8bb26">spec:
</span></span></span><span style="display:flex;"><span><span style="color:#b8bb26">  backend:
</span></span></span><span style="display:flex;"><span><span style="color:#b8bb26">    serviceName: blog
</span></span></span><span style="display:flex;"><span><span style="color:#b8bb26">    servicePort: 80
</span></span></span><span style="display:flex;"><span><span style="color:#b8bb26">EOF</span>
</span></span><span style="display:flex;"><span>kubectl apply -f blog-ingress.yaml
</span></span></code></pre></div><p>In the case, you have a domain name pointing to your Ingress, you can also use host-based routing.</p>
<div class="highlight"><pre tabindex="0" style="color:#ebdbb2;background-color:#282828;-moz-tab-size:4;-o-tab-size:4;tab-size:4;-webkit-text-size-adjust:none;"><code class="language-bash" data-lang="bash"><span style="display:flex;"><span><span style="color:#fabd2f">echo</span> &gt; blog-ingress.yaml <span style="color:#b8bb26">&lt;&lt;EOF
</span></span></span><span style="display:flex;"><span><span style="color:#b8bb26">apiVersion: extensions/v1beta1
</span></span></span><span style="display:flex;"><span><span style="color:#b8bb26">kind: Ingress
</span></span></span><span style="display:flex;"><span><span style="color:#b8bb26">metadata:
</span></span></span><span style="display:flex;"><span><span style="color:#b8bb26">  name: blog
</span></span></span><span style="display:flex;"><span><span style="color:#b8bb26">  annotations:
</span></span></span><span style="display:flex;"><span><span style="color:#b8bb26">    kubernetes.io/ingress.class: nginx
</span></span></span><span style="display:flex;"><span><span style="color:#b8bb26">spec:
</span></span></span><span style="display:flex;"><span><span style="color:#b8bb26">  rules:
</span></span></span><span style="display:flex;"><span><span style="color:#b8bb26">  - host: &lt;your-blog-domain&gt;
</span></span></span><span style="display:flex;"><span><span style="color:#b8bb26">    http:
</span></span></span><span style="display:flex;"><span><span style="color:#b8bb26">      paths:
</span></span></span><span style="display:flex;"><span><span style="color:#b8bb26">      - backend:
</span></span></span><span style="display:flex;"><span><span style="color:#b8bb26">          serviceName: blog
</span></span></span><span style="display:flex;"><span><span style="color:#b8bb26">          servicePort: 80
</span></span></span><span style="display:flex;"><span><span style="color:#b8bb26">        path: /
</span></span></span><span style="display:flex;"><span><span style="color:#b8bb26">EOF</span>
</span></span><span style="display:flex;"><span>kubectl apply -f blog-ingress.yaml
</span></span></code></pre></div><h2 id="adding-certificates-using-lets-encrypt">Adding certificates using Let&rsquo;s Encrypt</h2>
<p>Of couse, if you publish content on the web, you want to serve it encrypted to your users. Once upon a time, using HTTPS was hard and expensive because you had to buy a certificate from a trusted company. Luckily, again, times have changed, and there is this wonderful initiative called <a href="https://letsencrypt.org">Let&rsquo;s Encrypt</a> and a cluster component called <a href="https://cert-manager.readthedocs.io/en/latest/index.html"><code>certmanager</code></a>.</p>
<p>To install <code>certmanager</code> and setup our ClusterIssuers, we have to run a few commands again.</p>
<div class="highlight"><pre tabindex="0" style="color:#ebdbb2;background-color:#282828;-moz-tab-size:4;-o-tab-size:4;tab-size:4;-webkit-text-size-adjust:none;"><code class="language-bash" data-lang="bash"><span style="display:flex;"><span><span style="color:#928374;font-style:italic"># install certmanager</span>
</span></span><span style="display:flex;"><span>kubectl apply -f https://raw.githubusercontent.com/jetstack/cert-manager/master/contrib/manifests/cert-manager/with-rbac.yaml
</span></span><span style="display:flex;"><span><span style="color:#928374;font-style:italic"># setup ClusterIssuer for letsencrypt-staging</span>
</span></span><span style="display:flex;"><span><span style="color:#fabd2f">echo</span> &gt; letsencrypt-staging.yaml <span style="color:#b8bb26">&lt;&lt;EOF
</span></span></span><span style="display:flex;"><span><span style="color:#b8bb26">apiVersion: certmanager.k8s.io/v1alpha1
</span></span></span><span style="display:flex;"><span><span style="color:#b8bb26">kind: ClusterIssuer
</span></span></span><span style="display:flex;"><span><span style="color:#b8bb26">metadata:
</span></span></span><span style="display:flex;"><span><span style="color:#b8bb26">  name: letsencrypt-staging
</span></span></span><span style="display:flex;"><span><span style="color:#b8bb26">spec:
</span></span></span><span style="display:flex;"><span><span style="color:#b8bb26">  acme:
</span></span></span><span style="display:flex;"><span><span style="color:#b8bb26">    server: https://acme-staging.api.letsencrypt.org/directory
</span></span></span><span style="display:flex;"><span><span style="color:#b8bb26">    email: &lt;your-email-address&gt;
</span></span></span><span style="display:flex;"><span><span style="color:#b8bb26">    privateKeySecretRef:
</span></span></span><span style="display:flex;"><span><span style="color:#b8bb26">      name: letsencrypt-staging
</span></span></span><span style="display:flex;"><span><span style="color:#b8bb26">    http01: {}
</span></span></span><span style="display:flex;"><span><span style="color:#b8bb26">EOF</span>
</span></span><span style="display:flex;"><span>kubectl apply -f letsencrypt-staging.yaml
</span></span><span style="display:flex;"><span><span style="color:#928374;font-style:italic"># setup ClusterIssuer for letsencrypt-prod</span>
</span></span><span style="display:flex;"><span><span style="color:#fabd2f">echo</span> &gt; letsencrypt-prod.yaml <span style="color:#b8bb26">&lt;&lt;EOF
</span></span></span><span style="display:flex;"><span><span style="color:#b8bb26">apiVersion: certmanager.k8s.io/v1alpha1
</span></span></span><span style="display:flex;"><span><span style="color:#b8bb26">kind: ClusterIssuer
</span></span></span><span style="display:flex;"><span><span style="color:#b8bb26">metadata:
</span></span></span><span style="display:flex;"><span><span style="color:#b8bb26">  name: letsencrypt-prod
</span></span></span><span style="display:flex;"><span><span style="color:#b8bb26">spec:
</span></span></span><span style="display:flex;"><span><span style="color:#b8bb26">  acme:
</span></span></span><span style="display:flex;"><span><span style="color:#b8bb26">    server: https://acme-v02.api.letsencrypt.org/directory
</span></span></span><span style="display:flex;"><span><span style="color:#b8bb26">    email: &lt;your-email-address&gt;
</span></span></span><span style="display:flex;"><span><span style="color:#b8bb26">    privateKeySecretRef:
</span></span></span><span style="display:flex;"><span><span style="color:#b8bb26">      name: letsencrypt-prod
</span></span></span><span style="display:flex;"><span><span style="color:#b8bb26">    http01: {}
</span></span></span><span style="display:flex;"><span><span style="color:#b8bb26">EOF</span>
</span></span><span style="display:flex;"><span>kubectl apply -f letsencrypt-prod.yaml
</span></span></code></pre></div><p>Remember to replace <code>&lt;your-email-address&gt;</code> with your own email. When you want to test your deployments, you can use <code>letsencrypt-staging</code> as a test issuer to check out if things work out as expected (because you do not have to deal with rate limits and such). Of couse, when you have a stable version running you should move to use <code>letsencrypt-prod</code> because the staging issuer is not trusted by default.</p>
<p>We finally have to update our Ingress, so we can test if our auto-encryption works well!</p>
<div class="highlight"><pre tabindex="0" style="color:#ebdbb2;background-color:#282828;-moz-tab-size:4;-o-tab-size:4;tab-size:4;-webkit-text-size-adjust:none;"><code class="language-bash" data-lang="bash"><span style="display:flex;"><span><span style="color:#fabd2f">echo</span> &gt; blog-ingress.yaml <span style="color:#b8bb26">&lt;&lt;EOF
</span></span></span><span style="display:flex;"><span><span style="color:#b8bb26">apiVersion: extensions/v1beta1
</span></span></span><span style="display:flex;"><span><span style="color:#b8bb26">kind: Ingress
</span></span></span><span style="display:flex;"><span><span style="color:#b8bb26">metadata:
</span></span></span><span style="display:flex;"><span><span style="color:#b8bb26">  name: blog
</span></span></span><span style="display:flex;"><span><span style="color:#b8bb26">  annotations:
</span></span></span><span style="display:flex;"><span><span style="color:#b8bb26">    kubernetes.io/ingress.class: nginx
</span></span></span><span style="display:flex;"><span><span style="color:#b8bb26">    certmanager.k8s.io/cluster-issuer: letsencrypt-staging
</span></span></span><span style="display:flex;"><span><span style="color:#b8bb26">spec:
</span></span></span><span style="display:flex;"><span><span style="color:#b8bb26">  tls:
</span></span></span><span style="display:flex;"><span><span style="color:#b8bb26">  - hosts:
</span></span></span><span style="display:flex;"><span><span style="color:#b8bb26">    - &lt;your-blog-domain&gt;
</span></span></span><span style="display:flex;"><span><span style="color:#b8bb26">    secretName: blog-tls
</span></span></span><span style="display:flex;"><span><span style="color:#b8bb26">  rules:
</span></span></span><span style="display:flex;"><span><span style="color:#b8bb26">  - host: &lt;your-blog-domain&gt;
</span></span></span><span style="display:flex;"><span><span style="color:#b8bb26">    http:
</span></span></span><span style="display:flex;"><span><span style="color:#b8bb26">      paths:
</span></span></span><span style="display:flex;"><span><span style="color:#b8bb26">      - backend:
</span></span></span><span style="display:flex;"><span><span style="color:#b8bb26">          serviceName: blog
</span></span></span><span style="display:flex;"><span><span style="color:#b8bb26">          servicePort: 80
</span></span></span><span style="display:flex;"><span><span style="color:#b8bb26">        path: /
</span></span></span><span style="display:flex;"><span><span style="color:#b8bb26">EOF</span>
</span></span><span style="display:flex;"><span>kubectl apply -f blog-ingress.yaml
</span></span></code></pre></div><p>Finally, our blog should be exposed using HTTPS! Remember to replace <code>letsencrypt-staging</code> with <code>letsencrypt-prod</code> when you are going public.</p>
]]></content></entry><entry><title type="html">Setting up a Kubernetes cluster on bare-metal</title><link href="https://blog.espe.tech/posts/kubernetes-baremetal/"/><id>https://blog.espe.tech/posts/kubernetes-baremetal/</id><published>2018-05-11T12:00:00+01:00</published><content type="html"><![CDATA[<p>You may find yourself sitting at home, thinking about software and stuff and what to do with that spare PC of yours. I&rsquo;ve got an idea: set up a single-node run-at-home Kubernetes cluster!</p>
<h2 id="we-need-a-ship-or-a-whale">We need a ship (or a whale)</h2>
<blockquote>
<p>A little disclaimer to start with: the configuration here provides no recovery mechanisms since it is based on a single master node. If you want to set up a high availability cluster, I recommend you consult the <a href="https://kubernetes.io/docs/setup/independent/high-availability/">excellent Kubernetes documentation</a>.</p>
</blockquote>
<p>But before we can install <code>kubeadm</code> itself, we first need a container runtime. Luckily most recent Linux distros come with Docker available through the package manager. So depending which distribution you run, you consult your package manager and ask it for Docker.</p>
<div class="highlight"><pre tabindex="0" style="color:#ebdbb2;background-color:#282828;-moz-tab-size:4;-o-tab-size:4;tab-size:4;-webkit-text-size-adjust:none;"><code class="language-bash" data-lang="bash"><span style="display:flex;"><span>sudo apt-get update
</span></span><span style="display:flex;"><span>sudo apt-get install -qy docker.io
</span></span></code></pre></div><p>Even if your package manager ships an older version of Docker, don&rsquo;t worry: Kubernetes works rather well with older versions.</p>
<h2 id="we-got-a-ship-we-need-a-captain">We got a ship, we need a captain!</h2>
<p>Installing Kubernetes is rather straightforwar but we first need to add the official Google package sources to our local listings.</p>
<div class="highlight"><pre tabindex="0" style="color:#ebdbb2;background-color:#282828;-moz-tab-size:4;-o-tab-size:4;tab-size:4;-webkit-text-size-adjust:none;"><code class="language-bash" data-lang="bash"><span style="display:flex;"><span>curl -s https://packages.cloud.google.com/apt/doc/apt-key.gpg <span style="color:#b8bb26">\
</span></span></span><span style="display:flex;"><span>    | sudo apt-key add -
</span></span><span style="display:flex;"><span><span style="color:#fabd2f">echo</span> <span style="color:#b8bb26">&#34;deb http://apt.kubernetes.io/ kubernetes-xenial main&#34;</span> <span style="color:#b8bb26">\
</span></span></span><span style="display:flex;"><span>    | sudo tee /etc/apt/sources.list.d/kubernetes.list
</span></span></code></pre></div><p>If adding the key does not work, you may still need to install the <code>apt-transport-https</code> package.
Now we can update our package manager and install the <code>kubeadm</code>, <code>kubelet</code> and <code>kubernetes-cni</code> tool.</p>
<div class="highlight"><pre tabindex="0" style="color:#ebdbb2;background-color:#282828;-moz-tab-size:4;-o-tab-size:4;tab-size:4;-webkit-text-size-adjust:none;"><code class="language-bash" data-lang="bash"><span style="display:flex;"><span>sudo apt-get update
</span></span><span style="display:flex;"><span>sudo apt-get install -qy <span style="color:#b8bb26">\
</span></span></span><span style="display:flex;"><span>    kubelet kubeadm kubernetes-cni
</span></span></code></pre></div><h2 id="careful-here-stormy-waters-ahead">Careful here, stormy waters ahead</h2>
<p>But before can actually use these tools, you need to further prepare the runtime system for a new captain.
Since Kubernetes does not work well with Linux swap files/partitions, it is <em>strongly recommended</em> to disable
swap space.</p>
<p>The easiest way to perform this action is to edit your <code>/etc/fstab</code>, comment out the <code>swap</code> line(s) and reboot the system.
After rebooting, we need to get the IP we want to advertise our cluster on. When you run this action in a datacenter, you may pick the private networking IP provided by your hoster. When we run this at home, you may have only one IP assigned by your router or hypervisor so we will pick this one.</p>
<div class="highlight"><pre tabindex="0" style="color:#ebdbb2;background-color:#282828;-moz-tab-size:4;-o-tab-size:4;tab-size:4;-webkit-text-size-adjust:none;"><code class="language-bash" data-lang="bash"><span style="display:flex;"><span>ip -c a
</span></span></code></pre></div><div class="highlight"><pre tabindex="0" style="color:#ebdbb2;background-color:#282828;-moz-tab-size:4;-o-tab-size:4;tab-size:4;-webkit-text-size-adjust:none;"><code class="language-bash" data-lang="bash"><span style="display:flex;"><span>...
</span></span><span style="display:flex;"><span>2: ens3: &lt;BROADCAST,MULTICAST,UP,LOWER_UP&gt; ...
</span></span><span style="display:flex;"><span>    link/ether 52:54:00:7e:76:cb brd ff:ff:ff:ff:ff:ff
</span></span><span style="display:flex;"><span>    inet 192.168.10.234/24 brd 192.168.10.255 scope global ens3
</span></span><span style="display:flex;"><span>       valid_lft forever preferred_lft forever
</span></span><span style="display:flex;"><span>    inet6 ...
</span></span></code></pre></div><p>When I run the command on my local machine, I see that I may use <code>192.168.10.234</code> in this case.
One command is actually is enough to tell Kubernetes to setup our cluster using bootstrapping!</p>
<div class="highlight"><pre tabindex="0" style="color:#ebdbb2;background-color:#282828;-moz-tab-size:4;-o-tab-size:4;tab-size:4;-webkit-text-size-adjust:none;"><code class="language-bash" data-lang="bash"><span style="display:flex;"><span>sudo kubeadm init <span style="color:#b8bb26">\
</span></span></span><span style="display:flex;"><span>    --pod-network-cidr<span style="color:#fe8019">=</span>10.244.0.0/16 <span style="color:#b8bb26">\
</span></span></span><span style="display:flex;"><span>    --apiserver-advertise-address<span style="color:#fe8019">=</span>192.168.10.234 <span style="color:#b8bb26">\
</span></span></span><span style="display:flex;"><span>    --kubernetes-version stable-1.10
</span></span></code></pre></div><blockquote>
<p>If you want to add more nodes later on, I recommend to save the <code>kubeadm join</code> command printed out on your screen. It allows an easy extension of your lonely one-node cluster.</p>
</blockquote>
<p>The <code>kubeadm</code> stores the configuration required to access the cluster via <code>kubectl</code> in a file under <code>/etc/kubernetes/admin.conf</code>.
By copying it to our home directory, we can access the cluster without using <code>sudo</code> all the time.</p>
<div class="highlight"><pre tabindex="0" style="color:#ebdbb2;background-color:#282828;-moz-tab-size:4;-o-tab-size:4;tab-size:4;-webkit-text-size-adjust:none;"><code class="language-bash" data-lang="bash"><span style="display:flex;"><span>mkdir ~/.kube/
</span></span><span style="display:flex;"><span>sudo cp /etc/kubernetes/admin.conf $HOME/.kube/config
</span></span><span style="display:flex;"><span>sudo chown <span style="color:#fe8019">$(</span>id -u<span style="color:#fe8019">)</span>:<span style="color:#fe8019">$(</span>id -g<span style="color:#fe8019">)</span> $HOME/.kube/config
</span></span></code></pre></div><p>If you want to access the cluster from another machine, you need to copy the configuration file to it.</p>
<div class="highlight"><pre tabindex="0" style="color:#ebdbb2;background-color:#282828;-moz-tab-size:4;-o-tab-size:4;tab-size:4;-webkit-text-size-adjust:none;"><code class="language-bash" data-lang="bash"><span style="display:flex;"><span>scp &lt;username&gt;@&lt;master-ip&gt;:~/.kube/config kubeconfig
</span></span><span style="display:flex;"><span><span style="color:#fabd2f">export</span> KUBECONFIG<span style="color:#fe8019">=</span>./kubeconfig
</span></span></code></pre></div><blockquote>
<p>You may want to copy the <code>kubeconfig</code> file into <code>$HOME/.kube/config</code> to use it as your default <code>kubectl</code> configuration. Be careful, you overwrite existing configurations when copying. As an alternative, you can use multiple files as your kubeconfig by separating each file path using a <code>:</code> (e.g. <code>KUBECONFIG=~/kubeconf1:~/kubeconf2 kubectl get nodes</code>).</p>
</blockquote>
<h2 id="we-got-a-ship-and-a-captain-but-we-still-need-a-sail">We got a ship and a captain but we still need a sail</h2>
<p>In our case the sail will be <a href="https://github.com/coreos/flannel">flannel</a>, a popular layer 3 network fabric by CoreOS. Because even though Kubernetes allocates an IP for each pod, it actually takes not the responsibility of routing the traffic between the pods. Now, there are actually two approaches for solving this problem:
either you use a software-defined network that encapsulates the traffic or you can actually setup physical infrastructure with real switches and router which is more performant but a little bit overkill for a home cluster.
If you want to learn more about the Kubernetes network model, you can <a href="https://kubernetes.io/docs/concepts/cluster-administration/networking/">check out the documentation</a>.</p>
<p>Setting up virtual networking was really complicated once but since we are living in the days of modern DevOps, we can setup virtual infrastructure by just running a few (actually just one) command.</p>
<div class="highlight"><pre tabindex="0" style="color:#ebdbb2;background-color:#282828;-moz-tab-size:4;-o-tab-size:4;tab-size:4;-webkit-text-size-adjust:none;"><code class="language-bash" data-lang="bash"><span style="display:flex;"><span>kubectl apply -f <span style="color:#b8bb26">\
</span></span></span><span style="display:flex;"><span>    https://raw.githubusercontent.com/coreos/flannel/v0.10.0/Documentation/kube-flannel.yml
</span></span></code></pre></div><p>The supplied file actually does a lot of things I will not go deeper into, but it sets up roles for RBAC, a security model for the Kubernetes API, creates service accounts, configurations and a daemon-set. This is interesting because the container networking infrastructure then actually runs on top of Kubernetes itself.</p>
<h2 id="the-lonely-master">The lonely master</h2>
<p>Since we only have one node in our cluster the master has to do all the work.
To allow it to do the heavy lifting we must actually taint it.</p>
<div class="highlight"><pre tabindex="0" style="color:#ebdbb2;background-color:#282828;-moz-tab-size:4;-o-tab-size:4;tab-size:4;-webkit-text-size-adjust:none;"><code class="language-bash" data-lang="bash"><span style="display:flex;"><span>kubectl taint nodes --all node-role.kubernetes.io/master-
</span></span></code></pre></div><p>Now our master node is captain and cabin boy at the same time, how wonderful!</p>
<h2 id="running-the-dashboard">Running the dashboard</h2>
<p>Since using <code>kubectl</code> is a nice way to interact your cluster, you stil want to see those nice, green graphs.
To get this experience, we can install the Kubernetes dashboard.</p>
<div class="highlight"><pre tabindex="0" style="color:#ebdbb2;background-color:#282828;-moz-tab-size:4;-o-tab-size:4;tab-size:4;-webkit-text-size-adjust:none;"><code class="language-bash" data-lang="bash"><span style="display:flex;"><span>kubectl apply -f <span style="color:#b8bb26">\
</span></span></span><span style="display:flex;"><span>    https://raw.githubusercontent.com/kubernetes/dashboard/master/src/deploy/recommended/kubernetes-dashboard.yaml
</span></span></code></pre></div><p>Since we use the secure RBAC role model, we need some more configuration files.
First of all, we need a <code>ServiceAccount</code> and a <code>ClusterRoleBinding</code>.</p>
<div class="highlight"><pre tabindex="0" style="color:#ebdbb2;background-color:#282828;-moz-tab-size:4;-o-tab-size:4;tab-size:4;-webkit-text-size-adjust:none;"><code class="language-bash" data-lang="bash"><span style="display:flex;"><span>cat &gt; account.yaml <span style="color:#b8bb26">&lt;&lt; EOF
</span></span></span><span style="display:flex;"><span><span style="color:#b8bb26">apiVersion: v1
</span></span></span><span style="display:flex;"><span><span style="color:#b8bb26">kind: ServiceAccount
</span></span></span><span style="display:flex;"><span><span style="color:#b8bb26">metadata:
</span></span></span><span style="display:flex;"><span><span style="color:#b8bb26">  name: admin-user
</span></span></span><span style="display:flex;"><span><span style="color:#b8bb26">  namespace: kube-system
</span></span></span><span style="display:flex;"><span><span style="color:#b8bb26">EOF</span>
</span></span><span style="display:flex;"><span>cat &gt; rolebinding.yaml <span style="color:#b8bb26">&lt;&lt; EOF
</span></span></span><span style="display:flex;"><span><span style="color:#b8bb26">apiVersion: rbac.authorization.k8s.io/v1beta1
</span></span></span><span style="display:flex;"><span><span style="color:#b8bb26">kind: ClusterRoleBinding
</span></span></span><span style="display:flex;"><span><span style="color:#b8bb26">metadata:
</span></span></span><span style="display:flex;"><span><span style="color:#b8bb26">  name: admin-user
</span></span></span><span style="display:flex;"><span><span style="color:#b8bb26">roleRef:
</span></span></span><span style="display:flex;"><span><span style="color:#b8bb26">  apiGroup: rbac.authorization.k8s.io
</span></span></span><span style="display:flex;"><span><span style="color:#b8bb26">  kind: ClusterRole
</span></span></span><span style="display:flex;"><span><span style="color:#b8bb26">  name: cluster-admin
</span></span></span><span style="display:flex;"><span><span style="color:#b8bb26">subjects:
</span></span></span><span style="display:flex;"><span><span style="color:#b8bb26">- kind: ServiceAccount
</span></span></span><span style="display:flex;"><span><span style="color:#b8bb26">  name: admin-user
</span></span></span><span style="display:flex;"><span><span style="color:#b8bb26">  namespace: kube-system
</span></span></span><span style="display:flex;"><span><span style="color:#b8bb26">EOF</span>
</span></span><span style="display:flex;"><span>kubectl apply -f account.yaml
</span></span><span style="display:flex;"><span>kubectl apply -f rolebinding.yaml
</span></span></code></pre></div><p>We can now fetch the secret token from <code>kube-system</code>.</p>
<div class="highlight"><pre tabindex="0" style="color:#ebdbb2;background-color:#282828;-moz-tab-size:4;-o-tab-size:4;tab-size:4;-webkit-text-size-adjust:none;"><code class="language-bash" data-lang="bash"><span style="display:flex;"><span>kubectl -n kube-system describe secret <span style="color:#b8bb26">\
</span></span></span><span style="display:flex;"><span>    <span style="color:#fe8019">$(</span>kubectl -n kube-system get secret | grep admin-user | awk <span style="color:#b8bb26">&#39;{print $1}&#39;</span><span style="color:#fe8019">)</span> <span style="color:#b8bb26">\
</span></span></span><span style="display:flex;"><span>    | grep <span style="color:#b8bb26">&#34;token:&#34;</span>
</span></span></code></pre></div><div class="highlight"><pre tabindex="0" style="color:#ebdbb2;background-color:#282828;-moz-tab-size:4;-o-tab-size:4;tab-size:4;-webkit-text-size-adjust:none;"><code class="language-bash" data-lang="bash"><span style="display:flex;"><span>token:      eyJhbGciOiJSUzI1NiIsImtpZCI6IiJ9.ey...
</span></span></code></pre></div><p>Copy the token to your clipboard, we can now forward the Kubernetes API to our development machine (I assume you have copied the kubeconf to your local machine, you may need SSH port forwarding else).</p>
<div class="highlight"><pre tabindex="0" style="color:#ebdbb2;background-color:#282828;-moz-tab-size:4;-o-tab-size:4;tab-size:4;-webkit-text-size-adjust:none;"><code class="language-bash" data-lang="bash"><span style="display:flex;"><span>kubectl proxy
</span></span></code></pre></div><p>You can reach the dashboard via <a href="http://localhost:8001/api/v1/namespaces/kube-system/services/https:kubernetes-dashboard:/proxy/">a very long pretty URL</a>. Use the token retrieved from above to sign in.</p>
<p><strong>Congratulations, you actually set up your own local Kubernetes cluster!</strong> Have fun experimenting and always remember to sail safe.</p>
<blockquote>
<p>If you want to add more nodes to your cluster, repeat all steps until you reach <code>kubeadm init</code>. Use the <code>kubeadm join</code> printed out when you set up your master and you are ready to go.</p>
</blockquote>
]]></content></entry><entry><title type="html">Building APIs in Go: Business logic</title><link href="https://blog.espe.tech/posts/intro-to-go-2/"/><id>https://blog.espe.tech/posts/intro-to-go-2/</id><published>2017-11-09T12:00:00+01:00</published><content type="html"><![CDATA[<p>In this post I will explain how to build a nice and working RESTful API for our weather service using only the Go standard library.
If you missed <a href="https://blog.espe.tech/2017-08-11/intro-to-go-part-1">the first part of this series</a>, I recommend reading it before continuing here.</p>
<p>You can find the codebase of this introductory series <a href="https://github.com/lnsp/go-demos/blob/f4f9f1e99dd988e55944a25eb42e26d05aa8b35f/weather-api/main.go">on GitHub</a>.</p>
<h2 id="extending-the-blueprint">Extending the blueprint</h2>
<p>Well, we have a nice blueprint of the handlers we want, but shoving around global variables is neither fun nor good style. So we will extend each of our handlers to use Go&rsquo;s support of <em>higher-order functions</em>, that allows us to use functions as values. We will do this for each of our handlers. Our final result should look something like this. Notice the changes in the <em>main</em> method when registering the handlers.</p>
<div class="highlight"><pre tabindex="0" style="color:#ebdbb2;background-color:#282828;-moz-tab-size:4;-o-tab-size:4;tab-size:4;-webkit-text-size-adjust:none;"><code class="language-go" data-lang="go"><span style="display:flex;"><span><span style="color:#928374;font-style:italic">// import ...</span>
</span></span><span style="display:flex;"><span>
</span></span><span style="display:flex;"><span><span style="color:#fe8019">func</span> <span style="color:#fabd2f">listCitiesHandler</span>(service weather.Service) http.HandlerFunc {
</span></span><span style="display:flex;"><span>    <span style="color:#fe8019">return</span> <span style="color:#fe8019">func</span>(w http.ResponseWriter, r <span style="color:#fe8019">*</span>http.Request) {
</span></span><span style="display:flex;"><span>	    fmt.<span style="color:#fabd2f">Fprintln</span>(w, <span style="color:#b8bb26">&#34;/city&#34;</span>)
</span></span><span style="display:flex;"><span>    }
</span></span><span style="display:flex;"><span>}
</span></span><span style="display:flex;"><span>
</span></span><span style="display:flex;"><span><span style="color:#fe8019">func</span> <span style="color:#fabd2f">showTemperatureHandler</span>(service weather.Service) http.HandlerFunc {
</span></span><span style="display:flex;"><span>    <span style="color:#fe8019">return</span> <span style="color:#fe8019">func</span>(w http.ResponseWriter, r <span style="color:#fe8019">*</span>http.Request) {
</span></span><span style="display:flex;"><span>        fmt.<span style="color:#fabd2f">Fprintln</span>(w, <span style="color:#b8bb26">&#34;/city/&#34;</span>)
</span></span><span style="display:flex;"><span>    }
</span></span><span style="display:flex;"><span>}
</span></span><span style="display:flex;"><span>
</span></span><span style="display:flex;"><span><span style="color:#fe8019">func</span> <span style="color:#fabd2f">sendReportHandler</span>(service weather.Service) http.HandlerFunc {
</span></span><span style="display:flex;"><span>    <span style="color:#fe8019">return</span> <span style="color:#fe8019">func</span>(w http.ResponseWriter, r <span style="color:#fe8019">*</span>http.Request) {
</span></span><span style="display:flex;"><span>        fmt.<span style="color:#fabd2f">Fprintln</span>(w, <span style="color:#b8bb26">&#34;/report&#34;</span>)
</span></span><span style="display:flex;"><span>    }
</span></span><span style="display:flex;"><span>}
</span></span><span style="display:flex;"><span>
</span></span><span style="display:flex;"><span><span style="color:#fe8019">func</span> <span style="color:#fabd2f">main</span>() {
</span></span><span style="display:flex;"><span>    service <span style="color:#fe8019">:=</span> weather.<span style="color:#fabd2f">NewInMemoryService</span>()
</span></span><span style="display:flex;"><span>    http.<span style="color:#fabd2f">HandleFunc</span>(<span style="color:#b8bb26">&#34;/city&#34;</span>, <span style="color:#fabd2f">listCitiesHandler</span>(service))
</span></span><span style="display:flex;"><span>    http.<span style="color:#fabd2f">HandleFunc</span>(<span style="color:#b8bb26">&#34;/city/&#34;</span>, <span style="color:#fabd2f">showTemperatureHandler</span>(service))
</span></span><span style="display:flex;"><span>    http.<span style="color:#fabd2f">HandleFunc</span>(<span style="color:#b8bb26">&#34;/report&#34;</span>, <span style="color:#fabd2f">sendReportHandler</span>(service))
</span></span><span style="display:flex;"><span>    <span style="color:#928374;font-style:italic">// if err := ...</span>
</span></span><span style="display:flex;"><span>    <span style="color:#928374;font-style:italic">// ...</span>
</span></span><span style="display:flex;"><span>}
</span></span></code></pre></div><h2 id="listing-the-stations">Listing the stations</h2>
<p>Let&rsquo;s focus on the first handler on our blueprint, the city listing. To remind you of our handler description, we want something like the following.</p>
<p><strong>Example</strong>: Requesting a list of stations</p>
<div class="highlight"><pre tabindex="0" style="color:#ebdbb2;background-color:#282828;-moz-tab-size:4;-o-tab-size:4;tab-size:4;-webkit-text-size-adjust:none;"><code class="language-http" data-lang="http"><span style="display:flex;"><span>GET /city =&gt; {
</span></span><span style="display:flex;"><span>    &#34;munich&#34;,
</span></span><span style="display:flex;"><span>    &#34;zurich&#34;,
</span></span><span style="display:flex;"><span>    &#34;oberjoch&#34;
</span></span><span style="display:flex;"><span>}
</span></span></code></pre></div><p>When we look up <a href="https://godoc.org/github.com/lnsp/go-demos/weather#InMemoryService.Cities">the documentation</a> of the <em>weather</em> package we imported, we will learn that calling <a href="https://godoc.org/github.com/lnsp/go-demos/weather#Service.Cities"><code>service.Cities</code></a> would give us a slice of city names. But since we want the list in a JSON format, we will have to encode it. Luckily, Go provides a dead-simple package for serializing and deserializing structures from/to JSON called <a href="https://godoc.org/encoding/json"><code>encoding/json</code></a>.</p>
<p>We can divide our job to write the list of cities to the HTTP response into three basic steps:</p>
<ul>
<li>fetch the cities string slice</li>
<li>construct a new <a href="https://godoc.org/encoding/json#Encoder"><code>json.Encoder</code></a> for our <a href="https://godoc.org/net/http#ResponseWriter"><code>ResponseWriter</code></a></li>
<li>use our <a href="https://godoc.org/encoding/json#Encoder"><code>json.Encoder</code></a> to serialize the string slice (and ignore the error return value for now)</li>
</ul>
<p>This literally translates into the following Go code.</p>
<div class="highlight"><pre tabindex="0" style="color:#ebdbb2;background-color:#282828;-moz-tab-size:4;-o-tab-size:4;tab-size:4;-webkit-text-size-adjust:none;"><code class="language-go" data-lang="go"><span style="display:flex;"><span>cities <span style="color:#fe8019">:=</span> service.<span style="color:#fabd2f">Cities</span>()
</span></span><span style="display:flex;"><span>json.<span style="color:#fabd2f">NewEncoder</span>(w).<span style="color:#fabd2f">Encode</span>(cities)
</span></span></code></pre></div><p>Since this is all of the needed <em>business logic</em> in our <code>listCitiesHandler</code> handler, we are pretty much done here except for error handling.</p>
<div class="highlight"><pre tabindex="0" style="color:#ebdbb2;background-color:#282828;-moz-tab-size:4;-o-tab-size:4;tab-size:4;-webkit-text-size-adjust:none;"><code class="language-go" data-lang="go"><span style="display:flex;"><span><span style="color:#fe8019">func</span> <span style="color:#fabd2f">listCitiesHandler</span>(service weather.Service) http.HandleFunc {
</span></span><span style="display:flex;"><span>    <span style="color:#fe8019">return</span> <span style="color:#fe8019">func</span>(w http.ResponseWriter, r <span style="color:#fe8019">*</span>http.Request) {
</span></span><span style="display:flex;"><span>        <span style="color:#fe8019">if</span> r.Method <span style="color:#fe8019">!=</span> <span style="color:#b8bb26">&#34;GET&#34;</span> {
</span></span><span style="display:flex;"><span>            http.<span style="color:#fabd2f">Error</span>(w, <span style="color:#b8bb26">&#34;method not allowed&#34;</span>, http.StatusMethodNotAllowed)
</span></span><span style="display:flex;"><span>            <span style="color:#fe8019">return</span>
</span></span><span style="display:flex;"><span>        }
</span></span><span style="display:flex;"><span>        cities <span style="color:#fe8019">:=</span> service.<span style="color:#fabd2f">Cities</span>()
</span></span><span style="display:flex;"><span>        encoder <span style="color:#fe8019">:=</span> json.<span style="color:#fabd2f">NewEncoder</span>(w)
</span></span><span style="display:flex;"><span>        json.<span style="color:#fabd2f">NewEncoder</span>(w).<span style="color:#fabd2f">Encode</span>(cities)
</span></span><span style="display:flex;"><span>    }
</span></span><span style="display:flex;"><span>}
</span></span></code></pre></div><p>Luckily, again, Go provides another set of comfortable methods and constants to propagate errors back to the user using HTTP.
The first case to handle is when the user does request our <code>listCitiesHandler</code> service using the wrong HTTP method (something <em>absurd</em> like POST) and since we provide a strict <em>REST</em> API we shall not honor these fools with a valid response.
To show them the bad things they have done, we respond instead with a nice <em>method not allowed</em> status and text using the <a href="https://godoc.org/net/http#Error"><code>http.Error</code></a> method.
It accepts a <code>ResponseWriter</code>, a plain text error message and the HTTP error code as parameters.</p>
<p>A similar thing happens at the end of our handler when we fail on ourselves by somehow being not able to properly encode a list of strings.</p>
<h2 id="accessing-temperature-data">Accessing temperature data</h2>
<p>Our API users are now able to access a list of cities which have reported temperatures associated with. Well, of course, the user wants to know the current temperature
of a specific station. This is exactly, what our <code>showTemperatureHandler</code> has to do.</p>
<ol>
<li>Receive a station parameter from the user</li>
<li>Lookup station data</li>
<li>Convert to requested unit</li>
<li>Print out temperature</li>
</ol>
<p>This is a rather massive procedure, but we can easily decompose it into subproblems.
First of all, how can we take a station or city parameter from the user? We can simply use the HTML URI for that one!</p>
<div class="highlight"><pre tabindex="0" style="color:#ebdbb2;background-color:#282828;-moz-tab-size:4;-o-tab-size:4;tab-size:4;-webkit-text-size-adjust:none;"><code class="language-go" data-lang="go"><span style="display:flex;"><span>city <span style="color:#fe8019">:=</span> strings.<span style="color:#fabd2f">TrimPrefix</span>(r.URL.Path, <span style="color:#b8bb26">&#34;/city/&#34;</span>)
</span></span></code></pre></div><p>Using <a href="https://golang.org/pkg/net/url/#URL"><code>URL.Path</code></a> we can get the request path and strip away the unwanted path prefix with the standard library method <a href="https://golang.org/pkg/strings/#TrimPrefix"><code>strings.StripPrefix</code></a>.
Since the unit of measurement is still missing and we already know how to extract data from web URIs we chould choose to do the same for our optional parameter.
But careful: this would be extremely imprecise! We rather want to use a URI query parameter for our case.</p>
<div class="highlight"><pre tabindex="0" style="color:#ebdbb2;background-color:#282828;-moz-tab-size:4;-o-tab-size:4;tab-size:4;-webkit-text-size-adjust:none;"><code class="language-go" data-lang="go"><span style="display:flex;"><span>unit <span style="color:#fe8019">:=</span> r.URL.<span style="color:#fabd2f">Query</span>()[<span style="color:#b8bb26">&#34;unit&#34;</span>]
</span></span><span style="display:flex;"><span><span style="color:#fe8019">if</span> unit <span style="color:#fe8019">==</span> <span style="color:#fe8019">nil</span> {
</span></span><span style="display:flex;"><span>    <span style="color:#928374;font-style:italic">// provide default value</span>
</span></span><span style="display:flex;"><span>    unit = []<span style="color:#fabd2f">string</span>{<span style="color:#b8bb26">&#34;celsius&#34;</span>}
</span></span><span style="display:flex;"><span>}
</span></span></code></pre></div><p>We now got a string describing our unit of measurement, but we need to convert it into a discrete constant.</p>
<p>This way, we can easily provide a default value in case the tag is not provided and make use of the symbolic language of a question mark, visually marking the tag as optional.</p>
<h2 id="parsing-the-temperature-unit">Parsing the temperature unit</h2>
<p>The rest of the handler is very similar to the routine of the <code>listCitiesHandler</code> but instead of serializing a struct from a library, we will convert the temperature using a method called <code>parseTemperatureUnit</code> and use a custom response struct.</p>
<div class="highlight"><pre tabindex="0" style="color:#ebdbb2;background-color:#282828;-moz-tab-size:4;-o-tab-size:4;tab-size:4;-webkit-text-size-adjust:none;"><code class="language-go" data-lang="go"><span style="display:flex;"><span><span style="color:#fe8019">func</span> <span style="color:#fabd2f">parseTemperatureUnit</span>(unit <span style="color:#fabd2f">string</span>) (weather.Unit, <span style="color:#fabd2f">bool</span>) {
</span></span><span style="display:flex;"><span>	<span style="color:#fe8019">switch</span> strings.<span style="color:#fabd2f">ToLower</span>(unit) {
</span></span><span style="display:flex;"><span>	<span style="color:#fe8019">case</span> <span style="color:#b8bb26">&#34;kelvin&#34;</span>:
</span></span><span style="display:flex;"><span>		<span style="color:#fe8019">return</span> weather.Kelvin, <span style="color:#fe8019">true</span>
</span></span><span style="display:flex;"><span>	<span style="color:#fe8019">case</span> <span style="color:#b8bb26">&#34;celsius&#34;</span>:
</span></span><span style="display:flex;"><span>		<span style="color:#fe8019">return</span> weather.Celsius, <span style="color:#fe8019">true</span>
</span></span><span style="display:flex;"><span>	<span style="color:#fe8019">case</span> <span style="color:#b8bb26">&#34;fahrenheit&#34;</span>:
</span></span><span style="display:flex;"><span>		<span style="color:#fe8019">return</span> weather.Fahrenheit, <span style="color:#fe8019">true</span>
</span></span><span style="display:flex;"><span>	}
</span></span><span style="display:flex;"><span>	<span style="color:#fe8019">return</span> weather.Kelvin, <span style="color:#fe8019">false</span>
</span></span><span style="display:flex;"><span>}
</span></span></code></pre></div><p>We use a standard Go switch statement to match the unit. If we are not able to find a perfect match, we default to using Kelvin units.
Now we can finally parse our unit parameter and fetch the report from the datastore!</p>
<div class="highlight"><pre tabindex="0" style="color:#ebdbb2;background-color:#282828;-moz-tab-size:4;-o-tab-size:4;tab-size:4;-webkit-text-size-adjust:none;"><code class="language-go" data-lang="go"><span style="display:flex;"><span>requestedUnit, ok <span style="color:#fe8019">:=</span> <span style="color:#fabd2f">parseTemperatureUnit</span>(unit[<span style="color:#d3869b">0</span>])
</span></span><span style="display:flex;"><span><span style="color:#fe8019">if</span> !ok {
</span></span><span style="display:flex;"><span>    http.<span style="color:#fabd2f">Error</span>(w, <span style="color:#b8bb26">&#34;unknown unit of measurement&#34;</span>, http.StatusBadRequest)
</span></span><span style="display:flex;"><span>    <span style="color:#fe8019">return</span>
</span></span><span style="display:flex;"><span>}
</span></span><span style="display:flex;"><span>temp, err <span style="color:#fe8019">:=</span> service.<span style="color:#fabd2f">TemperatureIn</span>(city, requestedUnit)
</span></span><span style="display:flex;"><span><span style="color:#fe8019">if</span> err <span style="color:#fe8019">!=</span> <span style="color:#fe8019">nil</span> {
</span></span><span style="display:flex;"><span>    http.<span style="color:#fabd2f">Error</span>(w, <span style="color:#b8bb26">&#34;city not found&#34;</span>, http.StatusNotFound)
</span></span><span style="display:flex;"><span>    <span style="color:#fe8019">return</span>
</span></span><span style="display:flex;"><span>}
</span></span></code></pre></div>]]></content></entry><entry><title type="html">Building APIs in Go: A quick sketch</title><link href="https://blog.espe.tech/posts/intro-to-go-1/"/><id>https://blog.espe.tech/posts/intro-to-go-1/</id><published>2017-08-11T12:00:00+01:00</published><content type="html"><![CDATA[<p>First of all, welcome to my first blog post. Today I want to help you build your first RESTful API in Golang! The first two sections will help you getting started with Go, you may be able to skip these steps.</p>
<h2 id="installing-the-go-command-line-tool">Installing the <code>go</code> command line tool</h2>
<p>Before you can start writing Go code, you need the <code>go</code> command line tool that bundles the compiler and
a bunch of other development tools for you. Just visit <a href="https://golang.org/dl/">golang.org/dl/</a> to fetch
the latest version and install it on your workstation. Be sure to yet your <code>$GOPATH</code> correctly!</p>
<h2 id="printing-out-the-holy-mantra">Printing out the holy mantra</h2>
<p>Let start with something simple - why not hello world? Create a new file called <code>hello.go</code> or
whatever you want to name it and type the following code in your editor of choice.</p>
<div class="highlight"><pre tabindex="0" style="color:#ebdbb2;background-color:#282828;-moz-tab-size:4;-o-tab-size:4;tab-size:4;-webkit-text-size-adjust:none;"><code class="language-go" data-lang="go"><span style="display:flex;"><span><span style="color:#fe8019">package</span> main
</span></span><span style="display:flex;"><span>
</span></span><span style="display:flex;"><span><span style="color:#fe8019">import</span> <span style="color:#b8bb26">&#34;fmt&#34;</span>
</span></span><span style="display:flex;"><span>
</span></span><span style="display:flex;"><span><span style="color:#fe8019">func</span> <span style="color:#fabd2f">main</span>() {
</span></span><span style="display:flex;"><span>	fmt.<span style="color:#fabd2f">Println</span>(<span style="color:#b8bb26">&#34;hello, world&#34;</span>)
</span></span><span style="display:flex;"><span>}
</span></span></code></pre></div><p>If you want to run your program, just enter <code>go run hello.go</code> to execute it. Pretty straightforward, huh?
Let us dive a bit deeper into the structure of your first Go program. Before you continue with this post,
I recommend to get a bit more accustomed to the language by doing <a href="https://tour.golang.org/">the Go tour</a>.</p>
<h2 id="dive-into-the-magic">Dive into the magic</h2>
<p>In the very first line, we declare a <em>package</em>. Packages let us bundle batches of files into one component that
lie under a common namespace. Since we want to run our piece of work, it must be in the package <code>main</code> to be executable.</p>
<p>In the second line, we import a package called <code>fmt</code> (spoken like <em>format</em> or <em>fomt</em>, you decide).
It is a collection of methods and structures to help us print stuff to stdout and other data streams. In our program we will only use <a href="https://golang.org/pkg/fmt/#Println"><code>fmt.Println</code></a> which name is very descriptive: it just prints its arguments separated by spaces and adds a new line to the end.</p>
<p>In the third line, we declare a <em>function</em>. I assumed at the top that  you are not completely new to the concepts of programming, so it is pretty much the same thing as in every other language you have used so far. We call the function <code>main</code>, so it will be called right when we run our code.
Since we finished the holy mantra, we are blessed to go on with our journey. Now we will start building real server shit!</p>
<h2 id="designing-a-simple-api">Designing a simple API</h2>
<p>As I mentioned above, the power of the language and its standard library enables us to build server systems insanely fast. We will abuse some of that power and write a simple REST API for a community-run weather service. A client will be able to report and fetch current temperature values for a set of cities.</p>
<p><strong>Example:</strong> Report measured temperature in Munich</p>
<div class="highlight"><pre tabindex="0" style="color:#ebdbb2;background-color:#282828;-moz-tab-size:4;-o-tab-size:4;tab-size:4;-webkit-text-size-adjust:none;"><code class="language-bash" data-lang="bash"><span style="display:flex;"><span>$ curl -X POST -d @- localhost:8080/reports
</span></span><span style="display:flex;"><span><span style="color:#fe8019">{</span>
</span></span><span style="display:flex;"><span>	<span style="color:#b8bb26">&#34;city&#34;</span>: <span style="color:#b8bb26">&#34;munich&#34;</span>,
</span></span><span style="display:flex;"><span>	<span style="color:#b8bb26">&#34;temperature&#34;</span>: -12.0,  
</span></span><span style="display:flex;"><span>	<span style="color:#b8bb26">&#34;unit&#34;</span>: <span style="color:#b8bb26">&#34;celsius&#34;</span>
</span></span><span style="display:flex;"><span><span style="color:#fe8019">}</span>
</span></span><span style="display:flex;"><span>OK
</span></span></code></pre></div><p><strong>Example</strong>: List locations with available reports</p>
<div class="highlight"><pre tabindex="0" style="color:#ebdbb2;background-color:#282828;-moz-tab-size:4;-o-tab-size:4;tab-size:4;-webkit-text-size-adjust:none;"><code class="language-bash" data-lang="bash"><span style="display:flex;"><span>$ curl -X GET localhost:8080/reports
</span></span><span style="display:flex;"><span><span style="color:#fe8019">[</span><span style="color:#b8bb26">&#34;munich&#34;</span><span style="color:#fe8019">]</span>
</span></span></code></pre></div><p><strong>Example</strong>: Get the latest report from Munich</p>
<div class="highlight"><pre tabindex="0" style="color:#ebdbb2;background-color:#282828;-moz-tab-size:4;-o-tab-size:4;tab-size:4;-webkit-text-size-adjust:none;"><code class="language-bash" data-lang="bash"><span style="display:flex;"><span>$ curl -X GET localhost:8080/reports/munich
</span></span><span style="display:flex;"><span><span style="color:#fe8019">{</span><span style="color:#b8bb26">&#34;city&#34;</span>:<span style="color:#b8bb26">&#34;munich&#34;</span>,<span style="color:#b8bb26">&#34;temperature&#34;</span>:-12,<span style="color:#b8bb26">&#34;unit&#34;</span>:<span style="color:#b8bb26">&#34;celsius&#34;</span>,<span style="color:#b8bb26">&#34;timestamp&#34;</span>:1519520293<span style="color:#fe8019">}</span>
</span></span></code></pre></div><h2 id="organizing-packages">Organizing packages</h2>
<p>To make things a bit cleaner, we want to organize our API using the <code>$GOPATH</code>.
If you have a GitHub account, you can easily publish packages by setting up a repository in the <code>$GOPATH</code> directory. Let&rsquo;s assume you have this awesome library called <code>awesome-lib</code> located in <code>$GOPATH/src/github.com/yourgithubaccount/awesome-lib</code> and you have published it under the same repository name on GitHub, everyone can import your library using the statement <code>import &quot;github.com/yourgithubaccount/awesome-lib&quot;</code>. There is no need for a bloaty package manager!</p>
<p>We also want to do it this way and create a new folder called  <code>$GOPATH/src/github.com/yourgithubaccount/weather-api</code>. In this folder, we once again create a new file called <code>main.go</code> with the following content. You can look up the current snapshot of the package on <a href="https://github.com/lnsp/go-demos/tree/weather-api-init/weather-api">my GitHub account</a>.</p>
<h2 id="a-first-blueprint">A first blueprint</h2>
<div class="highlight"><pre tabindex="0" style="color:#ebdbb2;background-color:#282828;-moz-tab-size:4;-o-tab-size:4;tab-size:4;-webkit-text-size-adjust:none;"><code class="language-go" data-lang="go"><span style="display:flex;"><span><span style="color:#fe8019">package</span> main
</span></span><span style="display:flex;"><span>
</span></span><span style="display:flex;"><span><span style="color:#fe8019">import</span> (
</span></span><span style="display:flex;"><span>	<span style="color:#b8bb26">&#34;fmt&#34;</span>
</span></span><span style="display:flex;"><span>	<span style="color:#b8bb26">&#34;net/http&#34;</span>
</span></span><span style="display:flex;"><span>
</span></span><span style="display:flex;"><span>    <span style="color:#b8bb26">&#34;github.com/gorilla/mux&#34;</span>
</span></span><span style="display:flex;"><span>	<span style="color:#b8bb26">&#34;github.com/lnsp/go-demos/weather&#34;</span>
</span></span><span style="display:flex;"><span>)
</span></span><span style="display:flex;"><span>
</span></span><span style="display:flex;"><span><span style="color:#fe8019">type</span> weatherAPI <span style="color:#fe8019">struct</span> {
</span></span><span style="display:flex;"><span>    backend <span style="color:#fe8019">*</span>weather.Service
</span></span><span style="display:flex;"><span>    mux <span style="color:#fe8019">*</span>mux.Router
</span></span><span style="display:flex;"><span>}
</span></span><span style="display:flex;"><span>
</span></span><span style="display:flex;"><span><span style="color:#fe8019">func</span> (api <span style="color:#fe8019">*</span>weatherAPI) <span style="color:#fabd2f">ListCities</span>(w http.ResponseWriter, r <span style="color:#fe8019">*</span>http.Request) {
</span></span><span style="display:flex;"><span>    fmt.<span style="color:#fabd2f">Fprintln</span>(w, <span style="color:#b8bb26">`[&#34;munich&#34;]`</span>)
</span></span><span style="display:flex;"><span>}
</span></span><span style="display:flex;"><span>
</span></span><span style="display:flex;"><span><span style="color:#fe8019">func</span> (api <span style="color:#fe8019">*</span>weatherAPI) <span style="color:#fabd2f">CreateReport</span>(w http.ResponseWriter, r <span style="color:#fe8019">*</span>http.Request) {
</span></span><span style="display:flex;"><span>    fmt.<span style="color:#fabd2f">Fprintln</span>(w, <span style="color:#b8bb26">&#34;OK&#34;</span>)
</span></span><span style="display:flex;"><span>}
</span></span><span style="display:flex;"><span>
</span></span><span style="display:flex;"><span><span style="color:#fe8019">func</span> (api <span style="color:#fe8019">*</span>weatherAPI) <span style="color:#fabd2f">ShowTemperature</span>(w http.ResponseWriter, r <span style="color:#fe8019">*</span>http.Request) {
</span></span><span style="display:flex;"><span>    fmt.<span style="color:#fabd2f">Fprintln</span>(w, <span style="color:#b8bb26">`{&#34;city&#34;:&#34;munich&#34;,&#34;temperature&#34;:-12,&#34;unit&#34;:&#34;celsius&#34;,&#34;timestamp&#34;:1519520293}`</span>)
</span></span><span style="display:flex;"><span>}
</span></span><span style="display:flex;"><span>
</span></span><span style="display:flex;"><span><span style="color:#fe8019">func</span> (api <span style="color:#fe8019">*</span>weatherAPI) <span style="color:#fabd2f">ServeHTTP</span>(w http.ResponseWriter, r <span style="color:#fe8019">*</span>http.Request) {
</span></span><span style="display:flex;"><span>    api.mux.<span style="color:#fabd2f">ServeHTTP</span>(w, r)
</span></span><span style="display:flex;"><span>}
</span></span><span style="display:flex;"><span>
</span></span><span style="display:flex;"><span><span style="color:#fe8019">func</span> <span style="color:#fabd2f">newWeatherAPI</span>(backend weather.Service) <span style="color:#fe8019">*</span>weatherAPI {
</span></span><span style="display:flex;"><span>    api <span style="color:#fe8019">:=</span> <span style="color:#fe8019">&amp;</span>weatherAPI{
</span></span><span style="display:flex;"><span>        backend: backend,
</span></span><span style="display:flex;"><span>        mux: mux.<span style="color:#fabd2f">NewRouter</span>(),
</span></span><span style="display:flex;"><span>    }
</span></span><span style="display:flex;"><span>    api.mux.<span style="color:#fabd2f">HandleFunc</span>(<span style="color:#b8bb26">&#34;/reports&#34;</span>, api.ListCities).<span style="color:#fabd2f">Methods</span>(<span style="color:#b8bb26">&#34;GET&#34;</span>)
</span></span><span style="display:flex;"><span>    api.mux.<span style="color:#fabd2f">HandleFunc</span>(<span style="color:#b8bb26">&#34;/reports&#34;</span>, api.CreateReport).<span style="color:#fabd2f">Methods</span>(<span style="color:#b8bb26">&#34;POST&#34;</span>)
</span></span><span style="display:flex;"><span>    api.mux.<span style="color:#fabd2f">HandleFunc</span>(<span style="color:#b8bb26">&#34;/reports/{city}&#34;</span>, api.ShowTemperature).<span style="color:#fabd2f">Methods</span>(<span style="color:#b8bb26">&#34;GET&#34;</span>)
</span></span><span style="display:flex;"><span>    <span style="color:#fe8019">return</span> api
</span></span><span style="display:flex;"><span>}
</span></span><span style="display:flex;"><span>
</span></span><span style="display:flex;"><span><span style="color:#fe8019">func</span> <span style="color:#fabd2f">main</span>() {
</span></span><span style="display:flex;"><span>    backend <span style="color:#fe8019">:=</span> weather.<span style="color:#fabd2f">NewInMemoryService</span>()
</span></span><span style="display:flex;"><span>    handler <span style="color:#fe8019">:=</span> <span style="color:#fabd2f">newWeatherAPI</span>(backend)
</span></span><span style="display:flex;"><span>	<span style="color:#fe8019">if</span> err <span style="color:#fe8019">:=</span> http.<span style="color:#fabd2f">ListenAndServe</span>(<span style="color:#b8bb26">&#34;:8080&#34;</span>, handler); err <span style="color:#fe8019">!=</span> <span style="color:#fe8019">nil</span> {
</span></span><span style="display:flex;"><span>		<span style="color:#fabd2f">panic</span>(err)
</span></span><span style="display:flex;"><span>	}
</span></span><span style="display:flex;"><span>}
</span></span></code></pre></div><h3 id="installing-dependencies">Installing dependencies</h3>
<p>Since we have external dependencies this time, you have to run <code>go get -v</code> to install these. If you want to test the system, just run <code>go run main.go</code> in your terminal, open a second tab and run <code>curl localhost:8080/reports</code> to send a request to your server. <code>curl</code> is an awesome tool to easily test simple APIs and we will continue to use it in this blog post.</p>
<h2 id="inspecting-the-blueprint">Inspecting the blueprint</h2>
<p>We see once again the <code>package main</code> statement and once again it means that we want to this piece of code to be executable. But this time, the <em>import</em> statement is different. Instead of a single package we give it a list of packages. These combined statements help us to visually group imports and keep our code clean and simple.</p>
<p>In the second import line, there is a package we don&rsquo;t know about yet: <code>net/http</code>. It provides a complete HTTP stack including an web server, HTTPS / HTTP2 support and a client implementation for sending out requests.</p>
<p>The third and fourth import lines define a <em>third-party package</em>, a package that is not included in
the standard library. In our case, we import one of my published packages called <code>weather</code> (the last part of the fully-qualified import path) and the wonderful <a href="https://godoc.org/github.com/gorilla/mux"><code>mux</code></a> package by the Gorilla project. The <code>weather</code> package was written for this tutorial and exposes a collections of structures that will provide the &ldquo;business logic&rdquo; for this project (mostly a simple in-memory datastore).</p>
<h2 id="spawning-an-api-instance">Spawning an API instance</h2>
<p>To easily be able to plug different implementations of the weather service backend into our RESTful API frontend, we create a structure that contains our systems dependencies called <code>weatherAPI</code>. This structure also implements the <code>http.Handler</code> interface, so we can just put it into the handler field of <code>http.ListenAndServe</code>. On instance creation, we have to make sure that our routes are connected in the right way – using the declarative syntax of <code>mux.Router</code> to only allow specific kinds of requests.</p>
<p>The first two <code>http.HandleFunc</code> calls are completely standard, nothing off the ordinary. In the third route we use something special called a route variable. These are provided by the <code>mux.Router</code> and allow us to easily extract parameters from a requests URI path.</p>
<h2 id="about-request-handlers">About request handlers</h2>
<p>The methods thrown into our router are pretty similar, all require a <a href="https://golang.org/pkg/net/http/#ResponseWriter"><code>http.ResponseWriter</code></a> and a <a href="https://golang.org/pkg/net/http/#Request"><code>*http.Request</code></a> as parameters. This function signature is defined in the package <a href="https://golang.org/pkg/net/http/"><code>http</code></a> as the type <a href="https://golang.org/pkg/net/http/#HandlerFunc"><code>http.HandlerFunc</code></a>. Since Go supports first-class functions, these functions can be thrown around just like another variable or constant. We can use their special signature to directly wire them to our web server.</p>
<p>All of the three handlers have a special role assigned.</p>
<ul>
<li><code>ListCities</code>, sends back a list of all available measurement locations</li>
<li><code>ShowTemperature</code>, sends back the last measured temperature at the specified place</li>
<li><code>CreateReport</code>, accepts new temperature measurement reports from client</li>
</ul>
<p>In each handler we use the legless sibling of the <a href="https://golang.org/pkg/fmt/#Println"><code>fmt.Println</code></a> method we used earlier called <a href="https://golang.org/pkg/fmt/#Fprintln"><code>fmt.Fprintln</code></a>. The only difference between these two is that the <a href="https://golang.org/pkg/fmt/#Fprintln"><code>fmt.Fprintln</code></a> version takes an implementation of the <a href="https://golang.org/pkg/io/#Writer"><code>io.Writer</code></a> interface as the first parameter.  Luckily, the <a href="https://golang.org/pkg/net/http/#ResponseWriter"><code>http.ResponseWriter</code></a> instance we received from our server implements this exact interface.</p>
<p>In the <code>main</code> method we first initialize our package variable <code>service</code> using a method from the <code>weather</code>
package called <a href="https://godoc.org/github.com/lnsp/go-demos/weather#NewInMemoryService"><code>NewInMemoryService</code></a> which provides a simple in-memory implementation of the <a href="https://godoc.org/github.com/lnsp/go-demos/weather#Service"><code>weather.Service</code></a> interface. Then we call <code>newWeatherAPI</code>, it instantiates a new API handler, sets up the needed routes and returns it.</p>
<p>In case you don&rsquo;t have it discovered yet: every reference in this post mentioning a library package or an item in one of theses packages, is a link to the matching documentation.
Go provides excellent tooling including a documentation tool called <code>godoc</code>. <a href="https://godoc.org">godoc.org</a>, a hosted version of the <code>godoc</code> tool, provides documentation for each publicly available package.</p>
<h2 id="moving-on">Moving on</h2>
<p>I recommend to hack a bit around using the code above. If you don&rsquo;t have any ideas, here are some of mine.</p>
<ul>
<li>temper with the output, let it print other messages the writer</li>
<li>add an additional handler</li>
</ul>
<p>In the second part of this article series, we will learn about error handling, more standard library packages
and JSON encoding and decoding.</p>
]]></content></entry></feed>